Author: Diana

  • Air Fryer Chicken Thighs

    Air Fryer Chicken Thighs

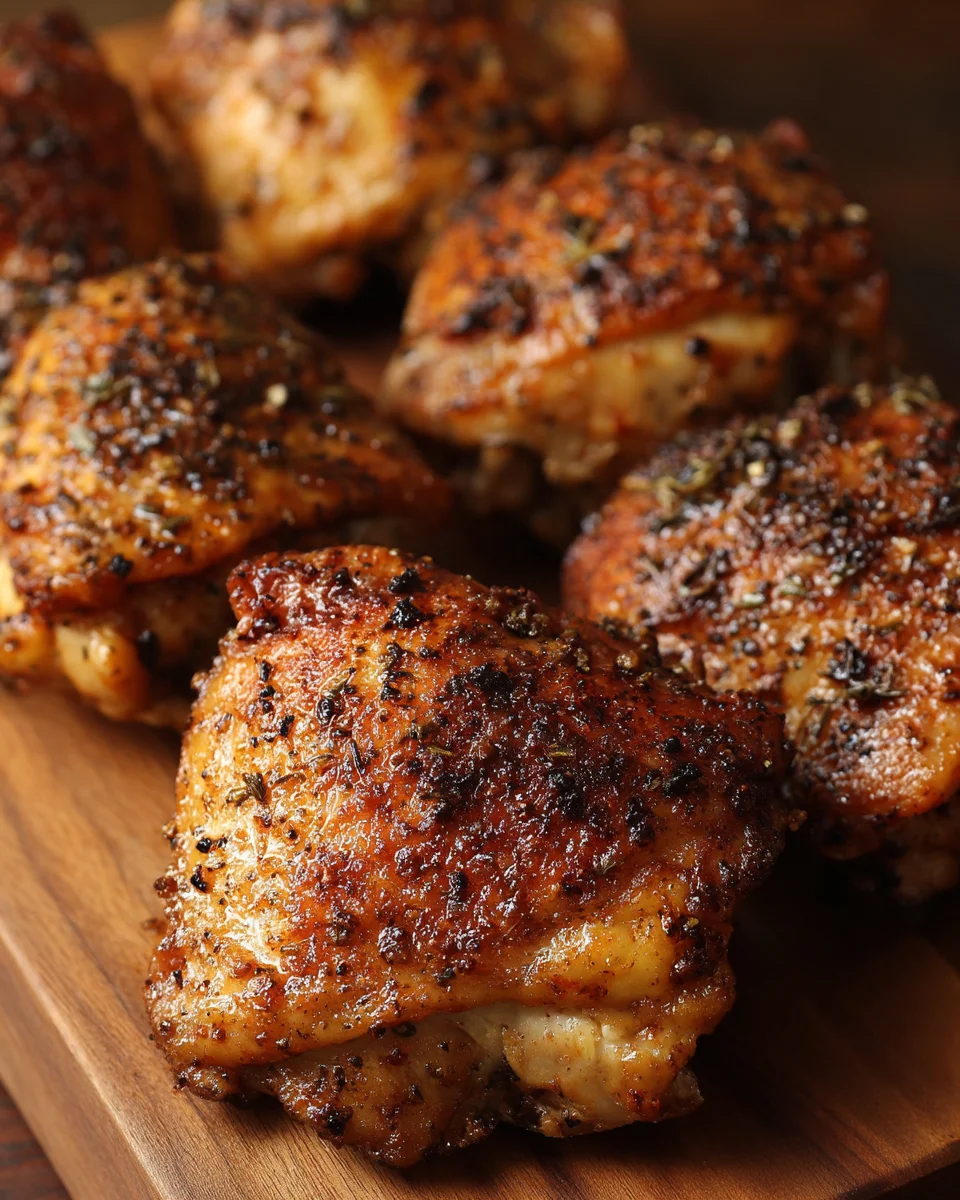
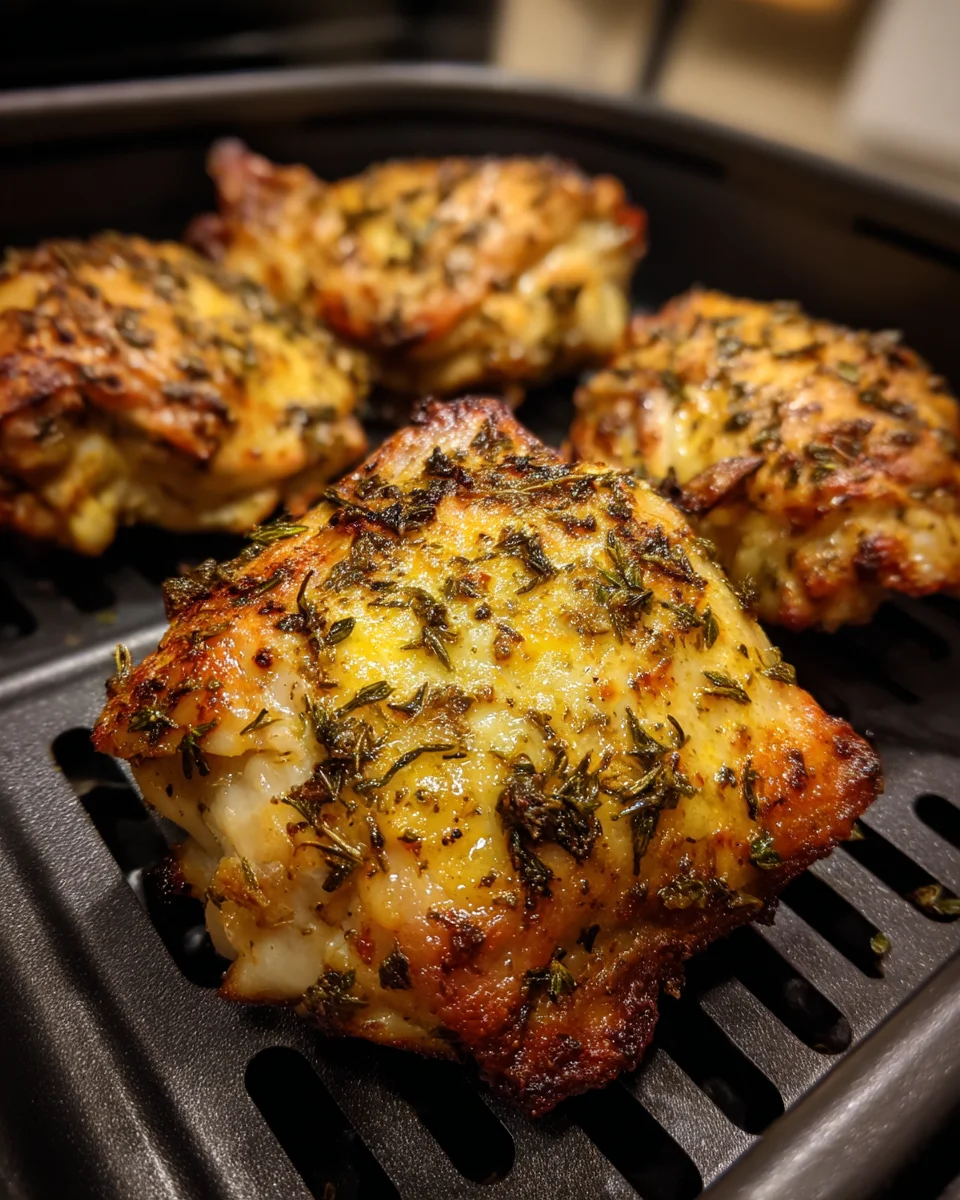
    Air Fryer Chicken Thighs are a fantastic option for busy weeknights and special occasions alike. With their crispy exterior and juicy interior, these chicken thighs deliver exceptional flavor without the extra oil. Perfectly cooked in an air fryer, they are not only healthier but also incredibly easy to prepare, making them a go-to dish for any cook.

    Why You’ll Love This Recipe

    • Quick Cooking Time: Air Fryer Chicken Thighs cook faster than traditional methods, allowing you to enjoy a delicious meal in no time.
    • Healthier Option: Using an air fryer reduces the need for excess oil, making this dish a healthier alternative without sacrificing taste.
    • Versatile Flavor Profile: You can easily customize the marinade or seasoning to suit your taste preferences or dietary needs.
    • Crispy Texture: The air fryer gives chicken thighs a delightful crispiness that is hard to resist.
    • Minimal Cleanup: Cooking with an air fryer means fewer pots and pans to wash afterward, saving you time and effort.

    Tools and Preparation

    To prepare Air Fryer Chicken Thighs, you need some essential tools that will make the cooking process smooth and efficient.

    Essential Tools and Equipment

    • Air fryer
    • Mixing bowl
    • Measuring spoons
    • Cutting board
    • Knife

    Importance of Each Tool

    • Air fryer: The star of this recipe, it circulates hot air around the chicken to achieve that perfect crispiness and juicy texture.
    • Mixing bowl: Essential for combining your marinade ingredients evenly before coating the chicken thighs.
    • Measuring spoons: Ensures accurate measurements of spices and oils for consistent flavor every time.

    Ingredients

    For the Chicken

    • 1.5 pounds bone-in chicken thighs
    • 1 tablespoon olive oil
    • Salt and black pepper to taste

    For the Marinade

    • 4 garlic cloves, minced
    • 1 teaspoon paprika
    • 1/2 teaspoon dried thyme
    • 1 teaspoon onion powder
    • 1 tablespoon lemon juice
    Air

    How to Make Air Fryer Chicken Thighs

    Step 1: Prepare the Marinade

    In a mixing bowl, combine the following ingredients:
    1. Add 4 minced garlic cloves, 1 teaspoon paprika, 1/2 teaspoon dried thyme, 1 teaspoon onion powder, and 1 tablespoon lemon juice.
    2. Mix thoroughly until well combined.

    Step 2: Season the Chicken

    1. Pat dry 1.5 pounds of bone-in chicken thighs with paper towels.
    2. Place chicken thighs in the bowl with the marinade.
    3. Drizzle 1 tablespoon olive oil, then season with salt and black pepper to taste.
    4. Rub the marinade all over each thigh, ensuring they are evenly coated.

    Step 3: Preheat the Air Fryer

    Preheat your air fryer to 400°F (200°C) for about 5 minutes.

    Step 4: Cook the Chicken Thighs

    1. Arrange the marinated chicken thighs in a single layer in the air fryer basket.
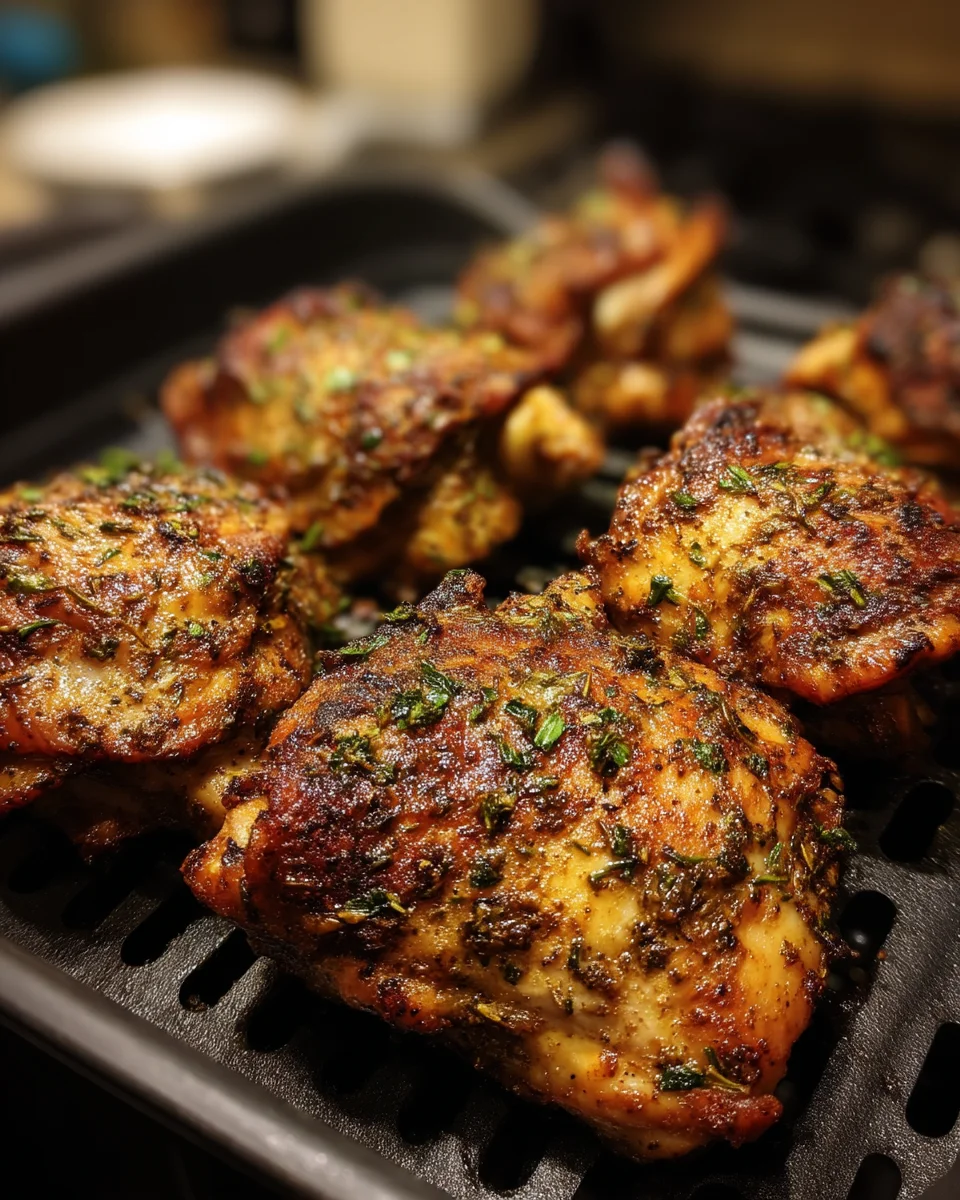
    2. Cook at 400°F (200°C) for 25-30 minutes or until internal temperature reaches 165°F (74°C).
    3. Flip halfway through cooking for even crispiness.

    Enjoy your delicious Air Fryer Chicken Thighs as a main dish or pair them with your favorite sides!

    How to Serve Air Fryer Chicken Thighs

    Serving Air Fryer Chicken Thighs can be a delightful experience with various accompaniments that enhance their flavor and texture. Here are some creative serving suggestions to elevate your meal.

    With Fresh Salads

    • Crisp Garden Salad: Combine mixed greens, cherry tomatoes, cucumbers, and a light vinaigrette for a refreshing side.
    • Caesar Salad: Toss romaine lettuce with Caesar dressing, croutons, and Parmesan cheese for a classic pairing.

    With Grains

    • Fluffy Rice: Serve the chicken thighs over 1 cup of steamed jasmine or basmati rice for a filling dish.
    • Quinoa Salad: Mix 1 cup of cooked quinoa with diced veggies and a splash of lemon juice for a nutritious side.

    With Vegetables

    • Roasted Broccoli: Drizzle 2 cups of broccoli florets with olive oil and roast them until tender for a healthy option.
    • Sautéed Green Beans: Cook 2 cups of green beans in garlic and olive oil until just tender for a flavorful addition.

    How to Perfect Air Fryer Chicken Thighs

    To achieve the best results when making Air Fryer Chicken Thighs, consider these helpful tips. They will ensure your chicken turns out juicy and flavorful every time.

    • Marinate Before Cooking: Allow the chicken thighs to marinate in ¼ cup of soy sauce or your favorite marinade for at least 30 minutes to enhance flavor.
    • Pat Dry the Chicken: Ensure the skin is dry before seasoning; this helps achieve crispiness during air frying.
    • Use Olive Oil Generously: Lightly coat the chicken thighs with about 1 tablespoon of olive oil for better browning.
    • Check Internal Temperature: Use a meat thermometer to ensure the thighs reach an internal temperature of 165°F (74°C) for safety.
    • Don’t Overcrowd the Basket: Place only 4-6 thighs in the air fryer basket at one time to allow proper airflow and even cooking.
    • Let Rest Before Serving: Allow the chicken to rest for 5 minutes after cooking; this helps retain juices.
    Air

    Best Side Dishes for Air Fryer Chicken Thighs

    Pairing Air Fryer Chicken Thighs with complementary side dishes can create a well-rounded meal. Here are some excellent options to consider.

    1. Garlic Mashed Potatoes: Creamy mashed potatoes made with 2 pounds of potatoes, butter, and garlic make for a comforting side.
    2. Coleslaw: A crunchy slaw made from shredded cabbage and carrots mixed with mayonnaise is refreshing next to rich chicken.
    3. Corn on the Cob: Grilled or boiled corn brushed with butter offers a sweet contrast to savory chicken thighs.
    4. Baked Sweet Potatoes: Roast sweet potatoes at 400°F (200°C) for about 45 minutes until soft; they add natural sweetness.
    5. Couscous Salad: Prepare couscous using 1 cup of water and mix in diced vegetables and herbs for a light side dish.
    6. Roasted Brussels Sprouts: Toss halved Brussels sprouts in olive oil and roast them until crispy; they add depth to your plate.

    Common Mistakes to Avoid

    Cooking Air Fryer Chicken Thighs can be simple, but there are common pitfalls. Here are some mistakes to avoid for perfect results.

    • Bold seasoning – Over-seasoning is a common mistake. Limit salt to 1/2 teaspoon to keep flavors balanced.
    • Bold overcrowding – Placing too many thighs in the air fryer can lead to uneven cooking. Ensure there’s space between each piece.
    • Bold improper temperature – Using the wrong temperature can affect texture. Cook at 400°F (200°C) for crispy skin.
    • Bold neglecting to pat dry – Skipping this step can cause soggy skin. Always pat chicken thighs dry with paper towels before seasoning.
    • Bold not using a meat thermometer – Undercooking is risky. Use a meat thermometer to ensure internal temperature reaches 165°F (74°C).

    Storage & Reheating Instructions

    Refrigerator Storage

    • Store leftover Air Fryer Chicken Thighs in an airtight container.
    • They can last up to 3-4 days in the refrigerator.

    Freezing Air Fryer Chicken Thighs

    • Place cooled chicken thighs in freezer-safe bags or containers.
    • They will maintain quality for up to 3 months in the freezer.

    Reheating Air Fryer Chicken Thighs

    • Oven – Preheat the oven to 375°F (190°C) and bake for about 10-15 minutes until heated through.
    • Microwave – Heat on medium power for 2-3 minutes, checking frequently to avoid drying out.
    • Stovetop – Heat in a skillet over medium heat for about 5 minutes, turning occasionally.
    Air

    Frequently Asked Questions

    Here are some frequently asked questions regarding Air Fryer Chicken Thighs that can help clarify any doubts.

    How do I make Air Fryer Chicken Thighs crispy?

    To achieve crispy skin, ensure you pat the chicken dry and use a light coating of oil. Cooking at 400°F (200°C) also helps.

    Can I use frozen chicken thighs in air fryer recipes?

    Yes, you can cook frozen chicken thighs directly in your air fryer. Increase the cooking time by about 5-10 minutes, ensuring they reach an internal temperature of 165°F (74°C).

    What spices work best for Air Fryer Chicken Thighs?

    Try using a mix of paprika, garlic powder, and black pepper for delicious flavor. Use about 1 teaspoon of each spice per pound of chicken.

    How long do Air Fryer Chicken Thighs take to cook?

    Typically, they take around 25-30 minutes at 400°F (200°C). Always check doneness with a meat thermometer.

    Final Thoughts

    Air Fryer Chicken Thighs are not only quick and easy but also flavorful and versatile. You can customize them with different spices or marinades according to your taste preferences. Try this recipe today for a delicious meal!

    Print

    Air Fryer Chicken Thighs

    5 Stars 4 Stars 3 Stars 2 Stars 1 Star

    No reviews

    Indulge in the delightful crunch of Air Fryer Chicken Thighs, a perfect dish for busy weeknights or special occasions. With a crispy exterior and juicy interior, these chicken thighs are packed with flavor while remaining healthier due to minimal oil usage. This recipe allows you to enjoy a quick, easy meal without compromising taste or texture. Seasoned with garlic and lemon for a zesty kick, this dish can be customized with your favorite spices, making it a versatile addition to your dinner rotation.

    • Author: Diana
    • Prep Time: 10 minutes
    • Cook Time: 30 minutes
    • Total Time: 40 minutes
    • Yield: Serves approximately four people 1x
    • Category: Lunch & Dinner
    • Method: Frying
    • Cuisine: American

    Ingredients

    Scale
    • 1.5 pounds bone-in chicken thighs
    • 1 tablespoon olive oil
    • Salt and black pepper to taste
    • 4 garlic cloves, minced
    • 1 teaspoon paprika
    • 1/2 teaspoon dried thyme
    • 1 teaspoon onion powder
    • 1 tablespoon lemon juice

    Instructions

    1. In a mixing bowl, combine minced garlic, paprika, thyme, onion powder, and lemon juice.
    2. Pat dry the chicken thighs and place them in the bowl with the marinade. Drizzle with olive oil and season with salt and pepper. Rub the marinade all over the thighs.
    3. Preheat the air fryer to 400°F (200°C) for 5 minutes.
    4. Arrange the marinated chicken in a single layer in the air fryer basket. Cook for 25-30 minutes or until they reach an internal temperature of 165°F (74°C), flipping halfway through.

    Nutrition

    • Serving Size: 1 chicken thigh (150g)
    • Calories: 305
    • Sugar: 0 g
    • Sodium: 560 mg
    • Fat: 22 g
    • Saturated Fat: 6 g
    • Unsaturated Fat: 15 g
    • Trans Fat: 0 g
    • Carbohydrates: 2 g
    • Fiber: 0 g
    • Protein: 28 g
    • Cholesterol: 127 mg

    Did you make this recipe?

    Share a photo and tag us — we can’t wait to see what you’ve made!

  • Creamy Shrimp Alfredo Pasta

    Creamy Shrimp Alfredo Pasta

    The Creamy Shrimp Alfredo Pasta is a delightful dish that’s perfect for any occasion, from a cozy family dinner to an elegant gathering. This creamy and rich pasta is sure to impress with its delectable flavors and smooth texture. Featuring succulent shrimp enveloped in a luscious Alfredo sauce, this dish stands out for its simplicity and satisfying taste.

    Why You’ll Love This Recipe

    • Quick and Easy: This recipe comes together in under 30 minutes, making it ideal for busy weeknights.
    • Rich Flavor: The combination of garlic, cream, and Parmesan cheese creates a savory sauce that elevates the pasta.
    • Versatile Dish: You can easily customize the recipe by adding your favorite vegetables or proteins.
    • Perfectly Creamy: The use of heavy cream ensures a luxurious mouthfeel that pairs beautifully with the shrimp.
    • Family-Friendly: This dish is sure to please both adults and kids alike, making it a hit at the dinner table.

    Tools and Preparation

    To make this creamy delight, you’ll need a few essential tools that will streamline your cooking process.

    Essential Tools and Equipment

    • Large pot
    • Skillet
    • Colander
    • Measuring cups
    • Measuring spoons
    • Wooden spoon

    Importance of Each Tool

    • Large pot: Essential for boiling pasta evenly and ensuring it cooks to perfection.
    • Skillet: Used to sauté shrimp and create the creamy Alfredo sauce in one pan, reducing cleanup time.

    Ingredients

    For the Pasta

    • 12 ounces fettuccine pasta

    For the Sauce

    • 1 tablespoon olive oil
    • 3 cloves garlic, minced
    • 1 cup heavy cream
    • 1 cup grated Parmesan cheese
    • Salt and black pepper to taste

    For the Shrimp

    • 1 pound shrimp, peeled and deveined

    Optional Garnish

    • 2 tablespoons fresh parsley, chopped
    Creamy

    How to Make Creamy Shrimp Alfredo Pasta

    Step 1: Cook the Pasta

    1. Bring a large pot of salted water to a boil.
    2. Add the fettuccine pasta and cook according to package instructions until al dente (usually about 8–10 minutes).
    3. Reserve 1 cup of pasta water before draining the pasta in a colander.

    Step 2: Sauté the Shrimp

    1. In a skillet over medium heat, add 1 tablespoon olive oil.
    2. Once heated, add the peeled and deveined shrimp. Cook for about 2-3 minutes on each side until they turn pink.
    3. Remove shrimp from skillet and set aside.

    Step 3: Prepare the Alfredo Sauce

    1. In the same skillet used for shrimp, add minced garlic (3 cloves) and sauté for about 30 seconds until fragrant.
    2. Pour in 1 cup heavy cream, stirring constantly until heated through (do not let it boil).
    3. Gradually whisk in 1 cup grated Parmesan cheese, stirring until melted and smooth.

    Step 4: Combine Pasta with Sauce

    1. Add the drained fettuccine to the skillet with Alfredo sauce.
    2. Toss well to coat all noodles evenly with sauce. If needed, add reserved pasta water little by little to reach desired consistency.

    Step 5: Finish with Shrimp

    1. Gently fold in cooked shrimp into the pasta mixture.
    2. Season with salt and black pepper to taste.

    Step 6: Serve

    1. Plate your creamy shrimp Alfredo pasta hot.
    2. Garnish with chopped parsley if desired for added freshness.

    Enjoy your delicious homemade creamy shrimp Alfredo pasta!

    How to Serve Creamy Shrimp Alfredo Pasta

    Creamy Shrimp Alfredo Pasta is a delightful dish that can be served in various ways to enhance your dining experience. Here are some serving suggestions to make your meal even more enjoyable.

    Elegant Plating

    • Use a deep pasta bowl for an elegant presentation.
    • Garnish with freshly grated Parmesan cheese and a sprig of parsley for added color.

    Pair with Garlic Bread

    • Serve alongside warm garlic bread made from 1 loaf of Italian bread, butter, 2 cloves of minced garlic, and a sprinkle of parsley for an irresistible combination.

    Add a Salad

    • A fresh green salad with mixed greens, cherry tomatoes, and a light vinaigrette complements the richness of the pasta beautifully.

    Offer Extra Toppings

    • Provide options like additional grated Parmesan (1 cup) or crushed red pepper flakes for those who enjoy some heat.

    How to Perfect Creamy Shrimp Alfredo Pasta

    To achieve the best results when making Creamy Shrimp Alfredo Pasta, consider the following tips:

    • Use fresh shrimp: Opt for 1 pound of fresh shrimp instead of frozen for better flavor and texture.
    • Cook pasta al dente: Boil 8 ounces of fettuccine until just tender; this ensures it maintains a slight bite when combined with the sauce.
    • Add cream slowly: Pour in 1 cup of heavy cream gradually while stirring to create a smooth and creamy sauce without lumps.
    • Season properly: Don’t forget to add salt and black pepper to taste; start with ½ teaspoon each.
    • Incorporate garlic: Sauté 2 cloves of minced garlic in butter before adding the cream for an aromatic flavor boost.
    Creamy

    Best Side Dishes for Creamy Shrimp Alfredo Pasta

    Pairing side dishes with Creamy Shrimp Alfredo Pasta can elevate your meal. Here are some excellent options:

    1. Steamed Broccoli: Lightly steamed broccoli adds a vibrant color and balances the richness of the pasta.
    2. Caesar Salad: This classic salad, made with romaine lettuce, croutons, and Caesar dressing, provides a crunchy contrast.
    3. Roasted Asparagus: Toss 1 bunch of asparagus in olive oil and roast at 400°F (200°C) for about 15 minutes for a delicious side.
    4. Garlic Mashed Potatoes: Creamy mashed potatoes made with 2 pounds of Yukon Gold potatoes complement the dish well.
    5. Bruschetta: Toasted bread topped with diced tomatoes, basil, and balsamic vinegar offers a refreshing bite.
    6. Grilled Zucchini: Slice 2 zucchinis and grill them lightly; they add flavor without overpowering the pasta’s richness.
    7. Caprese Skewers: Assemble cherry tomatoes, mozzarella balls, and fresh basil leaves on skewers for a fresh appetizer.

    Common Mistakes to Avoid

    When preparing Creamy Shrimp Alfredo Pasta, it’s easy to make mistakes that can affect the final dish. Here are some common pitfalls to watch out for:

    • Using the wrong pasta – Opt for fettuccine or linguine for the best texture; avoid thin pastas like spaghetti which won’t hold the sauce well.
    • Overcooking shrimp – Cook shrimp for only 2-3 minutes until pink and opaque; overcooking can make them tough and chewy.
    • Not measuring ingredients – For optimal flavor, use 1 cup heavy cream and 1/2 cup Parmesan cheese; avoid guessing amounts that can lead to imbalance.
    • Ignoring seasoning – Season with salt and pepper throughout cooking; don’t wait until the end, as flavors need time to develop.
    • Using low-quality cheese – Always use freshly grated Parmesan instead of pre-grated; it melts better and enhances flavor.

    Storage & Reheating Instructions

    Refrigerator Storage

    • Store in an airtight container for up to 3 days.
    • Allow the pasta to cool completely before sealing.
    • Avoid mixing in extra sauce if you plan to store leftovers.

    Freezing Creamy Shrimp Alfredo Pasta

    • Freeze in a freezer-safe container for up to 2 months.
    • Leave space at the top of the container for expansion.
    • It’s best to freeze without additional toppings for best results.

    Reheating Creamy Shrimp Alfredo Pasta

    • Oven – Preheat to 350°F (175°C), cover with foil, and heat for about 20 minutes or until warmed through.
    • Microwave – Use a microwave-safe dish, cover loosely, and heat in 1-minute intervals until hot, stirring in between.
    • Stovetop – Heat gently in a skillet over low heat, adding a splash of cream if needed to restore creaminess.
    Creamy

    Frequently Asked Questions

    Here are some common inquiries regarding Creamy Shrimp Alfredo Pasta.

    Can I use frozen shrimp?

    Yes, you can use frozen shrimp. Just thaw them in cold water before cooking.

    What kind of pasta is best for Creamy Shrimp Alfredo Pasta?

    Fettuccine is ideal as it holds onto the creamy sauce well. You can also try linguine or tagliatelle.

    How do I make it lighter?

    To lighten the dish, substitute half-and-half for heavy cream and reduce the cheese to 1/4 cup.

    Can I add vegetables?

    Absolutely! Consider adding spinach or broccoli. Steam vegetables separately and mix them in just before serving.

    How can I customize this recipe?

    You can customize by adding herbs like basil or parsley, using different seafood such as scallops, or changing the cheese type.

    Final Thoughts

    Creamy Shrimp Alfredo Pasta is a delightful dish that’s both rich and satisfying. It offers versatility with customization options like adding vegetables or spices. Whether it’s a weeknight dinner or a special occasion, this recipe is sure to impress. Don’t hesitate to give it a try!

    Print

    Creamy Shrimp Alfredo Pasta

    5 Stars 4 Stars 3 Stars 2 Stars 1 Star

    No reviews

    Creamy Shrimp Alfredo Pasta is a luscious and satisfying dish that brings the taste of fine dining right to your kitchen. With succulent shrimp nestled in a rich, velvety Alfredo sauce, this pasta is perfect for any occasion—whether it’s a cozy family dinner or an elegant gathering. Ready in under 30 minutes, this recipe balances simplicity with indulgent flavors. The combination of garlic, creamy goodness, and Parmesan cheese elevates this dish to comfort food perfection. Pair it with a fresh salad or garlic bread for an unforgettable meal that both adults and kids will love.

    • Author: Diana
    • Prep Time: 10 minutes
    • Cook Time: 20 minutes
    • Total Time: 30 minutes
    • Yield: Serves 4
    • Category: Main
    • Method: Stovetop
    • Cuisine: Italian

    Ingredients

    Scale
    • 12 ounces fettuccine pasta
    • 1 tablespoon olive oil
    • 3 cloves garlic, minced
    • 1 cup heavy cream
    • 1 cup grated Parmesan cheese
    • 1 pound shrimp, peeled and deveined
    • Salt and black pepper to taste
    • Optional: 2 tablespoons fresh parsley, chopped

    Instructions

    1. Cook fettuccine in a large pot of salted boiling water until al dente (8–10 minutes). Reserve 1 cup of pasta water before draining.
    2. In a skillet over medium heat, add olive oil and sauté shrimp for about 2–3 minutes per side until pink. Remove from skillet.
    3. In the same skillet, sauté minced garlic for 30 seconds, then add heavy cream and stir until heated (do not boil).
    4. Gradually whisk in Parmesan cheese until melted and smooth.
    5. Add drained fettuccine to the sauce and toss to combine; if needed, add reserved pasta water to adjust consistency.
    6. Fold in the cooked shrimp and season with salt and black pepper.
    7. Serve hot, garnished with parsley if desired.

    Nutrition

    • Serving Size: 1 plate (approximately 400g)
    • Calories: 655
    • Sugar: 2g
    • Sodium: 800mg
    • Fat: 35g
    • Saturated Fat: 20g
    • Unsaturated Fat: 12g
    • Trans Fat: 0g
    • Carbohydrates: 54g
    • Fiber: 3g
    • Protein: 29g
    • Cholesterol: 220mg

    Did you make this recipe?

    Share a photo and tag us — we can’t wait to see what you’ve made!

  • Garlic Parmesan Chicken Meatloaf

    Garlic Parmesan Chicken Meatloaf

    The Garlic Parmesan Chicken Meatloaf is a delightful dish that brings comfort food to a new level. Perfect for family dinners or gatherings, this meatloaf combines juicy chicken with the rich flavors of garlic and Parmesan cheese. Not only is it easy to prepare, but it also delivers a satisfying meal that can be paired with various sides for versatile dining options.

    Why You’ll Love This Recipe

    • Easy to Prepare: With simple steps and minimal prep time, this recipe is perfect for busy weeknights.
    • Flavorful Combination: The blend of garlic and Parmesan creates a mouthwatering taste that elevates traditional meatloaf.
    • Versatile Serving Options: Enjoy it as a main dish, in sandwiches, or even as leftovers for lunch.
    • Family-Friendly: Kids love the familiar taste while parents appreciate the healthy ingredients.
    • Great for Meal Prep: Make ahead and freeze portions for quick meals later on.

    Tools and Preparation

    Before diving into the cooking process, gather your tools to make preparation smoother. Having everything in place will help you achieve the best results.

    Essential Tools and Equipment

    • Mixing bowl
    • Meatloaf pan or baking dish
    • Measuring cups
    • Measuring spoons
    • Knife and cutting board

    Importance of Each Tool

    • Mixing bowl: Essential for combining ingredients evenly, ensuring every bite is flavorful.
    • Meatloaf pan or baking dish: Helps shape the meatloaf while allowing even cooking throughout the dish.

    Ingredients

    For the Chicken

    • 1 pound ground chicken
    • 1/2 cup breadcrumbs
    • 1/4 cup grated Parmesan cheese
    • 1 large egg
    • 3 cloves garlic, minced
    • 1 teaspoon salt
    • 1/2 teaspoon black pepper

    For the Seasoning

    • 1 tablespoon chopped fresh parsley
    • 1 teaspoon dried Italian herbs
    • 1/4 cup milk

    For Topping

    • 1/2 cup marinara sauce
    Garlic

    How to Make Garlic Parmesan Chicken Meatloaf

    Step 1: Prepare the Mixture

    In a large mixing bowl, combine the following:
    1. Add 1 pound ground chicken, 1/2 cup breadcrumbs, and 1/4 cup grated Parmesan cheese.
    2. Incorporate 3 cloves garlic, minced, along with 1 teaspoon salt, and 1/2 teaspoon black pepper.
    3. Crack in 1 large egg, then pour in 1/4 cup milk.
    4. Mix all ingredients until just combined; do not overmix.

    Step 2: Shape the Meatloaf

    Once mixed:
    – Transfer the mixture into a meatloaf pan or baking dish.
    – Form it into a loaf shape, ensuring it’s evenly packed.

    Step 3: Add Topping

    Spread 1/2 cup marinara sauce evenly over the top of the meatloaf.

    Step 4: Bake

    Preheat your oven to 350°F (175°C) and bake the meatloaf for about 45-55 minutes or until it reaches an internal temperature of 165°F (74°C).

    Step 5: Serve

    Let it rest for about 10 minutes before slicing. Serve warm with your favorite sides!

    How to Serve Garlic Parmesan Chicken Meatloaf

    Garlic Parmesan Chicken Meatloaf is a delightful dish that can be enjoyed in various ways. Here are some serving suggestions to elevate your dining experience.

    Classic Slice with Gravy

    • Serve thick slices of meatloaf topped with a rich brown gravy for a comforting meal.

    Sandwich Delight

    • Use leftover meatloaf to make a delicious sandwich with crusty bread, lettuce, and a spread of garlic aioli.

    Meatloaf Muffins

    • For a fun twist, bake individual portions in muffin tins. This makes for easy serving and perfect portion control.

    Salad Topper

    • Dice leftover meatloaf and toss it on top of a fresh salad for added protein and flavor.

    Pasta Companion

    • Serve slices alongside spaghetti or penne tossed in marinara sauce for a hearty Italian-inspired meal.

    Meal Prep Option

    • Portion out the meatloaf into containers for easy grab-and-go lunches throughout the week.

    How to Perfect Garlic Parmesan Chicken Meatloaf

    To achieve the best results with your Garlic Parmesan Chicken Meatloaf, consider these helpful tips.

    • Use fresh herbs: Incorporate 2 tablespoons of chopped fresh parsley or basil to enhance the flavor profile.
    • Check the temperature: Ensure the internal temperature reaches 165°F (74°C) for safe consumption. A meat thermometer is helpful here.
    • Moisture matters: Add 1/4 cup of milk or chicken broth to keep the meatloaf moist and tender during baking.
    • Rest before slicing: Allow the meatloaf to rest for at least 10 minutes after baking. This helps retain juices when slicing.
    • Experiment with cheese: Try adding 1/2 cup of shredded mozzarella or provolone cheese for extra creaminess and flavor.
    • Customize seasonings: Feel free to adjust garlic and parmesan quantities based on your taste preferences; add more if you love strong flavors!
    Garlic

    Best Side Dishes for Garlic Parmesan Chicken Meatloaf

    Pairing sides with Garlic Parmesan Chicken Meatloaf can enhance your meal significantly. Here are some great options to consider.

    1. Mashed Potatoes: Creamy mashed potatoes made with butter and cream are a classic pairing that complements meatloaf beautifully.
    2. Roasted Vegetables: A mix of seasonal vegetables like carrots, zucchini, and bell peppers, roasted with olive oil, adds color and nutrition.
    3. Green Beans Almondine: Fresh green beans sautéed with sliced almonds provide a crunchy texture contrast to the soft meatloaf.
    4. Cauliflower Rice: For a low-carb option, serve cauliflower rice seasoned with garlic powder and herbs as a light side dish.
    5. Coleslaw: A tangy coleslaw can offer freshness that balances the richness of the meatloaf; try using 2 cups of shredded cabbage and carrots.
    6. Crispy Brussels Sprouts: Oven-roasted Brussels sprouts drizzled with balsamic glaze add an earthy flavor that pairs well with chicken.
    7. Cornbread Muffins: Sweet cornbread muffins make an excellent accompaniment, providing a delightful contrast in texture and taste.
    8. Garlic Breadsticks: Soft breadsticks brushed with garlic butter will absorb any sauce from the meatloaf beautifully!

    Common Mistakes to Avoid

    Making Garlic Parmesan Chicken Meatloaf can be simple, but there are common errors that can affect the taste and texture. Here are some mistakes to avoid.

    • Ignoring ingredient freshness – Always use fresh garlic and herbs. Dried ingredients can lead to a dull flavor.
    • Using the wrong meat ratio – Stick to 1 pound of ground chicken for the best texture. Too little or too much can make it dense or crumbly.
    • Overseasoning – Limit salt to 1 teaspoon. Overdoing it can overpower the delicate flavors of garlic and parmesan.
    • Neglecting moisture – Don’t skip adding 1/2 cup of milk; it keeps the meatloaf moist and tender.
    • Skipping the resting time – Allow the meatloaf to rest for at least 10 minutes before slicing. This helps retain juices and improves texture.

    Storage & Reheating Instructions

    Refrigerator Storage

    • Store leftover Garlic Parmesan Chicken Meatloaf in an airtight container.
    • It will stay fresh for up to 3 days in the refrigerator.

    Freezing Garlic Parmesan Chicken Meatloaf

    • Wrap tightly in plastic wrap or aluminum foil before placing in a freezer bag.
    • You can freeze it for up to 3 months.

    Reheating Garlic Parmesan Chicken Meatloaf

    • Oven – Preheat your oven to 350°F (175°C) and heat for about 20 minutes. This method keeps it moist.
    • Microwave – Use medium power for 2-3 minutes, checking frequently to avoid overcooking.
    • Stovetop – Heat slices in a skillet over medium heat for about 5 minutes, flipping occasionally.
    Garlic

    Frequently Asked Questions

    Can I use turkey instead of chicken for Garlic Parmesan Chicken Meatloaf?

    Yes, you can use 1 pound of ground turkey as a substitute. The flavor will be slightly different but still delicious.

    What sides go well with Garlic Parmesan Chicken Meatloaf?

    Pair it with mashed potatoes, steamed vegetables, or a fresh salad. These sides complement its rich flavors nicely.

    How do I know when the meatloaf is done?

    The internal temperature should reach 165°F (74°C). Use a meat thermometer for accuracy.

    Can I customize the ingredients in Garlic Parmesan Chicken Meatloaf?

    Absolutely! You can add vegetables like bell peppers or zucchini (about 1/2 cup each, finely diced) for added nutrition and flavor.

    Final Thoughts

    Garlic Parmesan Chicken Meatloaf is not only delicious but also versatile. You can customize this recipe with your favorite herbs or vegetables, making it perfect for any occasion. Give it a try, and enjoy a comforting meal that’s sure to please!

    Print

    Garlic Parmesan Chicken Meatloaf

    5 Stars 4 Stars 3 Stars 2 Stars 1 Star

    No reviews

    Garlic Parmesan Chicken Meatloaf is a savory twist on a classic comfort dish, combining juicy ground chicken with aromatic garlic and rich Parmesan cheese. This easy-to-make meatloaf is perfect for busy weeknights, family gatherings, or meal prepping for the week ahead. With its flavorful profile and moist texture, this dish appeals to both kids and adults alike. Serve it as a hearty main course or transform leftovers into delicious sandwiches or salads. Whip up this delightful meatloaf recipe today for a satisfying meal that’s sure to become a family favorite.

    • Author: Diana
    • Prep Time: 15 minutes
    • Cook Time: 50 minutes
    • Total Time: 1 hour 5 minutes
    • Yield: Serves approximately 6 people 1x
    • Category: Main
    • Method: Baking
    • Cuisine: American

    Ingredients

    Scale
    • 1 pound ground chicken
    • 1/2 cup breadcrumbs
    • 1/4 cup grated Parmesan cheese
    • 1 large egg
    • 3 cloves garlic, minced
    • 1 teaspoon salt
    • 1/2 teaspoon black pepper
    • 1 tablespoon chopped fresh parsley
    • 1 teaspoon dried Italian herbs
    • 1/4 cup milk
    • 1/2 cup marinara sauce

    Instructions

    1. Preheat your oven to 350°F (175°C).
    2. In a mixing bowl, combine ground chicken, breadcrumbs, Parmesan cheese, minced garlic, salt, pepper, egg, milk, parsley, and Italian herbs. Mix until just combined.
    3. Transfer the mixture to a meatloaf pan or baking dish and shape it into a loaf.
    4. Spread marinara sauce evenly over the top of the loaf.
    5. Bake for 45-55 minutes or until the internal temperature reaches 165°F (74°C). Let rest for 10 minutes before slicing.

    Nutrition

    • Serving Size: 1 slice (approximately 130g)
    • Calories: 250
    • Sugar: 2g
    • Sodium: 450mg
    • Fat: 10g
    • Saturated Fat: 3g
    • Unsaturated Fat: 6g
    • Trans Fat: 0g
    • Carbohydrates: 12g
    • Fiber: 1g
    • Protein: 28g
    • Cholesterol: 100mg

    Did you make this recipe?

    Share a photo and tag us — we can’t wait to see what you’ve made!

  • Cherry Almond Bread

    Cherry Almond Bread

    Cherry Almond Bread is a delightful treat that combines the sweet and tart flavors of cherries with the rich, nutty essence of almonds. Perfect for breakfast, a snack, or even as a dessert, this bread is versatile enough to suit any occasion. Its moist texture and fragrant aroma will fill your kitchen with warmth, making it an instant favorite among family and friends.

    Why You’ll Love This Recipe

    • Irresistible Flavor: The combination of cherries and almonds creates a unique taste that’s both sweet and nutty.
    • Easy to Make: With simple steps and common ingredients, this recipe is perfect for bakers of all skill levels.
    • Versatile: Serve it as a breakfast option, a delightful afternoon snack, or a sweet addition to brunch.
    • Great for Sharing: This recipe yields enough for gatherings, ensuring everyone can enjoy a slice (or two).
    • Customizable: Feel free to add your favorite nuts or spices for an extra twist.

    Tools and Preparation

    Before you start baking your Cherry Almond Bread, gather the necessary tools. Having everything at hand makes the process smoother and more enjoyable.

    Essential Tools and Equipment

    • Mixing bowl
    • Measuring cups
    • Measuring spoons
    • Loaf pan
    • Whisk

    Importance of Each Tool

    • Mixing bowl: A large enough bowl allows you to combine ingredients easily without spills.
    • Measuring cups: Accurate measurements ensure consistent results in baking.
    • Loaf pan: The right size pan helps in achieving the perfect shape and texture for your bread.

    Ingredients

    For the Bread

    • 2 cups all-purpose flour
    • 1 teaspoon baking powder
    • ½ teaspoon baking soda
    • ¼ teaspoon salt
    • ¾ cup granulated sugar
    • ½ cup unsalted butter, softened
    • 2 large eggs
    • 1 teaspoon vanilla extract
    • 1 cup fresh or frozen cherries, pitted and chopped
    • ½ cup sliced almonds

    For the Topping

    • ¼ cup sliced almonds
    Cherry

    How to Make Cherry Almond Bread

    Step 1: Prepare the Batter

    1. Preheat your oven to 350°F (175°C) and grease your loaf pan.
    2. In a mixing bowl, whisk together 2 cups all-purpose flour, 1 teaspoon baking powder, ½ teaspoon baking soda, and ¼ teaspoon salt. Set aside.
    3. In another bowl, cream together ½ cup unsalted butter and *¾ cup granulated sugar until light and fluffy.
    4. Beat in the 2 large eggs, one at a time, followed by 1 teaspoon vanilla extract. Mix until well combined.

    Step 2: Combine Ingredients

    1. Gradually add the dry ingredients into the wet mixture. Stir until just combined; do not overmix.
    2. Gently fold in the chopped cherries and ½ cup sliced almonds, ensuring they are evenly distributed throughout the batter.

    Step 3: Bake the Bread

    1. Pour the batter into the prepared loaf pan.
    2. Sprinkle *¼ cup sliced almonds over the top for added texture.
    3. Bake in the preheated oven for about 60 minutes or until a toothpick inserted into the center comes out clean.

    Step 4: Cool and Serve

    1. Once baked, remove from oven and allow to cool in the pan for about 10 minutes.
    2. Transfer to a wire rack to cool completely before slicing.
    3. Enjoy your delicious Cherry Almond Bread!

    How to Serve Cherry Almond Bread

    Cherry Almond Bread is a delightful treat that can be enjoyed in many ways. Whether you’re having it for breakfast, dessert, or a snack, serving suggestions can enhance its flavor and appeal.

    Toasted with Butter

    • Spread warm butter on slices of Cherry Almond Bread for a rich flavor. The melted butter complements the cherry and almond notes beautifully.

    As French Toast

    • Dip slices of Cherry Almond Bread in a mixture of 2 eggs, 1/4 cup milk, and 1 teaspoon vanilla extract. Cook on a skillet until golden brown for a sweet breakfast twist.

    Paired with Cream Cheese

    • Top with cream cheese for a deliciously creamy contrast. This pairing works well as a mid-afternoon snack or light breakfast option.

    With Fresh Fruit

    • Serve alongside mixed berries or sliced bananas. The fresh fruit adds a refreshing burst that balances the sweetness of the bread.

    Drizzled with Honey

    • Drizzle honey over toasted slices for added sweetness. This simple addition enhances the natural flavors of almonds and cherries.

    How to Perfect Cherry Almond Bread

    To achieve the best results with your Cherry Almond Bread, consider these helpful tips.

    • Use fresh cherries: Opt for 1 cup of pitted, chopped fresh cherries instead of canned ones for better flavor and texture.
    • Incorporate almond extract: Adding 1 teaspoon of almond extract will intensify the almond flavor in every bite.
    • Measure flour accurately: Ensure you use 2 cups of all-purpose flour by spooning it into the measuring cup to avoid dense bread.
    • Add nuts: Include 1/2 cup of slivered almonds for extra crunch and nutty taste.
    • Cool completely before slicing: Allow the bread to cool for at least 30 minutes to prevent it from crumbling when cut.
    • Store properly: Keep leftover bread wrapped in plastic wrap at room temperature to maintain freshness for up to three days.
    Cherry

    Best Side Dishes for Cherry Almond Bread

    Pairing side dishes with your Cherry Almond Bread can elevate your meal experience. Here are some great options.

    1. Greek Yogurt Parfait: Layer Greek yogurt with granola and fresh fruit for a healthy side that complements the sweetness of the bread.
    2. Fruit Salad: A refreshing mix of seasonal fruits provides balance. Use about 2 cups total, combining favorites like strawberries and kiwis.
    3. Chia Seed Pudding: Prepare using 1/4 cup chia seeds mixed with 1 cup almond milk overnight. Its creaminess pairs well with bread.
    4. Smoothie Bowl: Blend together 1 banana, 1/2 cup spinach, and 1 cup almond milk. Top with nuts or seeds for added crunch.
    5. Herbed Cream Cheese Spread: Mix 8 ounces of cream cheese with herbs like dill and chives for a savory twist when served alongside the bread.
    6. Savory Oatmeal: Top cooked oatmeal with nuts or dried fruits as an earthy companion to balance out the sweetness of the bread.

    Common Mistakes to Avoid

    Making Cherry Almond Bread can be simple, but certain mistakes can ruin your baking experience. Here are some common pitfalls to avoid.

    • Using stale ingredients – Always check the freshness of your baking powder (1 teaspoon) and baking soda (1/2 teaspoon). Old ingredients won’t give your bread the rise it needs.
    • Overmixing the batter – Mix just until combined to avoid tough bread. A few lumps are okay; they will bake out.
    • Incorrect oven temperature – Preheat your oven to 350°F (175°C) before baking. An uncalibrated oven can lead to uneven baking.
    • Not measuring flour accurately – Use a kitchen scale for precision. Aim for 2 cups (240g) of all-purpose flour, spooned and leveled, to ensure the right texture.
    • Skipping the almond extract – This ingredient adds depth; don’t omit it! Use 1 teaspoon for the best flavor.

    Storage & Reheating Instructions

    Refrigerator Storage

    • Store Cherry Almond Bread in an airtight container for up to 5 days.
    • Place a piece of parchment paper between slices to keep them from sticking together.

    Freezing Cherry Almond Bread

    • Wrap the bread tightly in plastic wrap and then foil. Freeze for up to 3 months.
    • Slice before freezing if you want convenience for quick snacks.

    Reheating Cherry Almond Bread

    • Oven – Preheat to 350°F (175°C) and warm for about 10-15 minutes until heated through.
    • Microwave – Heat individual slices on medium power for about 15-20 seconds, checking frequently.
    • Stovetop – Toast slices on low heat in a skillet with a little butter for added flavor.
    Cherry

    Frequently Asked Questions

    Can I use frozen cherries in Cherry Almond Bread?

    Yes, you can use frozen cherries. Just make sure to thaw and drain them well before adding them to the batter.

    What can I substitute for almond extract?

    If you don’t have almond extract, you can use vanilla extract instead. Use the same amount, about 1 teaspoon, but note that it will alter the flavor slightly.

    How should I serve Cherry Almond Bread?

    Cherry Almond Bread is delightful served warm with a pat of butter or cream cheese. It also pairs beautifully with coffee or tea.

    Can I add other nuts?

    Absolutely! Feel free to mix in chopped walnuts or pecans, around 1/2 cup, along with the cherries for extra crunch.

    Final Thoughts

    Cherry Almond Bread is a delightful treat perfect for breakfast or as a snack. Its sweet and nutty flavors make it incredibly versatile. You can customize it by adding nuts or swapping out fruits based on your preferences. Enjoy this delicious recipe!

    Print

    Cherry Almond Bread

    5 Stars 4 Stars 3 Stars 2 Stars 1 Star

    No reviews

    Cherry Almond Bread is a delightful fusion of sweet cherries and nutty almonds, perfect for breakfast, snacks, or dessert. This easy-to-make loaf will fill your kitchen with an inviting aroma and quickly become a favorite among family and friends. The moist texture coupled with the crunchy almond topping makes each slice irresistible. Whether enjoyed warm with butter or transformed into French toast, this recipe is versatile enough for any occasion.

    • Author: Diana
    • Prep Time: 15 minutes
    • Cook Time: 60 minutes
    • Total Time: 1 hour 15 minutes
    • Yield: Approximately 12 slices 1x
    • Category: Dessert
    • Method: Baking
    • Cuisine: American

    Ingredients

    Scale
    • 2 cups all-purpose flour
    • 1 teaspoon baking powder
    • ½ teaspoon baking soda
    • ¼ teaspoon salt
    • ¾ cup granulated sugar
    • ½ cup unsalted butter, softened
    • 2 large eggs
    • 1 teaspoon vanilla extract
    • 1 cup fresh or frozen cherries, pitted and chopped
    • ½ cup sliced almonds
    • ¼ cup sliced almonds (for topping)

    Instructions

    1. Preheat your oven to 350°F (175°C) and grease a loaf pan.
    2. In a mixing bowl, whisk together the flour, baking powder, baking soda, and salt; set aside.
    3. In another bowl, cream the softened butter and granulated sugar until light and fluffy. Beat in the eggs one at a time, then add the vanilla extract.
    4. Gradually add the dry ingredients to the wet mixture until just combined. Gently fold in the chopped cherries and sliced almonds.
    5. Pour the batter into the prepared loaf pan and sprinkle the top with additional sliced almonds.
    6. Bake for about 60 minutes or until a toothpick inserted into the center comes out clean.
    7. Let cool in the pan for about 10 minutes before transferring to a wire rack to cool completely.

    Nutrition

    • Serving Size: 1 slice
    • Calories: 215
    • Sugar: 12g
    • Sodium: 125mg
    • Fat: 9g
    • Saturated Fat: 5g
    • Unsaturated Fat: 3g
    • Trans Fat: 0g
    • Carbohydrates: 31g
    • Fiber: 1g
    • Protein: 4g
    • Cholesterol: 45mg

    Did you make this recipe?

    Share a photo and tag us — we can’t wait to see what you’ve made!

  • Keto Cottage Cheese Pancakes

    Keto Cottage Cheese Pancakes

    Keto Cottage Cheese Pancakes are a delicious and nutritious option for breakfast or brunch. These pancakes feature the creamy goodness of cottage cheese, making them perfect for a low-carb, keto-friendly meal. They are fluffy, easy to whip up, and versatile enough for any occasion—whether it’s a lazy Sunday morning or a quick weekday breakfast. Plus, they can be topped with your favorite sugar-free syrup or fresh berries!

    Why You’ll Love This Recipe

    • Quick to Make: These pancakes come together in just a few minutes, making them ideal for busy mornings.
    • Low-Carb Delight: Perfect for those on a keto diet, these pancakes are low in carbs but high in protein.
    • Versatile Toppings: Enjoy them with various toppings like fresh fruits, nuts, or sugar-free syrups.
    • Fluffy Texture: The use of cottage cheese gives these pancakes an incredibly fluffy texture that you’ll love.
    • Family-Friendly: Even the kids will enjoy these tasty pancakes without knowing they’re healthy!

    Tools and Preparation

    Before diving into this easy recipe, gather your kitchen tools to ensure a smooth cooking process.

    Essential Tools and Equipment

    • Non-stick skillet or griddle
    • Mixing bowl
    • Whisk or fork
    • Measuring cups and spoons
    • Spatula

    Importance of Each Tool

    • Non-stick skillet or griddle: Ensures even cooking and prevents the pancakes from sticking.
    • Mixing bowl: Allows you to easily combine all the ingredients without mess.
    • Whisk or fork: Helps blend the ingredients smoothly for fluffy pancakes.

    Ingredients

    For the Pancakes

    • 1 cup cottage cheese
    • 3 large eggs
    • 1/2 teaspoon baking powder
    • 1/4 teaspoon salt
    • 1/2 teaspoon vanilla extract
    • 1/4 cup almond flour
    • 1 tablespoon coconut oil (for cooking)
    Keto

    How to Make Keto Cottage Cheese Pancakes

    Step 1: Prepare the Batter

    1. In a mixing bowl, combine 1 cup cottage cheese, 3 large eggs, 1/2 teaspoon baking powder, 1/4 teaspoon salt, and 1/2 teaspoon vanilla extract.
    2. Whisk the mixture until everything is well combined and smooth.
    3. Gradually stir in 1/4 cup almond flour, ensuring there are no lumps.

    Step 2: Heat the Skillet

    1. Preheat your non-stick skillet over medium heat.
    2. Add 1 tablespoon coconut oil, allowing it to melt and coat the skillet evenly.

    Step 3: Cook the Pancakes

    1. Pour about 1/4 cup of batter onto the skillet for each pancake.
    2. Cook for 3-4 minutes until bubbles form on top and edges look set.
    3. Carefully flip each pancake and cook for another 2-3 minutes until golden brown.

    Step 4: Serve and Enjoy

    1. Remove the pancakes from the skillet and place them on a plate.
    2. Top with your choice of sugar-free syrup, fresh berries, or whipped cream if desired.
    3. Serve warm and enjoy your delightful Keto Cottage Cheese Pancakes!

    How to Serve Keto Cottage Cheese Pancakes

    Keto Cottage Cheese Pancakes are versatile and can be served in various delightful ways. These pancakes are not only delicious but also healthy, making them a great option for breakfast or as a snack. Here are some serving suggestions to enhance your experience.

    Fresh Fruit Topping

    • Berries: Top your pancakes with 1/2 cup of mixed berries like strawberries, blueberries, and raspberries for a burst of freshness.
    • Sliced Bananas: Add 1 medium banana sliced for extra sweetness and creaminess.

    Nut Butter Spread

    • Almond Butter: Spread 2 tablespoons of almond butter on top for a rich, nutty flavor.
    • Peanut Butter: Use 2 tablespoons of natural peanut butter for a classic taste that pairs well with pancakes.

    Sugar-Free Syrup

    • Maple Syrup Alternative: Drizzle 2 tablespoons of sugar-free maple syrup over your pancakes for that sweet touch without the carbs.
    • Coconut Syrup: Use 2 tablespoons of sugar-free coconut syrup for a tropical twist.

    Greek Yogurt

    • Plain Greek Yogurt: Serve with 1/4 cup of plain Greek yogurt on the side for added creaminess and protein.
    • Flavored Greek Yogurt: Choose 1/4 cup of vanilla or berry-flavored Greek yogurt to enhance the taste.

    How to Perfect Keto Cottage Cheese Pancakes

    To achieve the best Keto Cottage Cheese Pancakes, it’s essential to follow some key tips that will elevate your cooking skills. These pointers can help you make light and fluffy pancakes every time.

    • Use fresh cottage cheese: Ensure your cottage cheese is fresh (about 1 cup) to achieve the perfect texture and taste.
    • Blend ingredients thoroughly: Mix all ingredients until smooth; this helps avoid lumps and creates fluffy pancakes.
    • Let the batter rest: Allow your batter to sit for about 5 minutes before cooking; this enhances texture by letting it thicken.
    • Cook on low heat: Use medium-low heat while cooking; this prevents burning and ensures even cooking (about 3-4 minutes per side).
    • Add flavorings wisely: Experiment by adding 1 teaspoon of vanilla extract or a pinch of cinnamon for added flavor without extra carbs.
    • Serve immediately: Enjoy your pancakes hot off the griddle; they taste best right after cooking!
    Keto

    Best Side Dishes for Keto Cottage Cheese Pancakes

    Pairing your Keto Cottage Cheese Pancakes with complementary side dishes can create a balanced meal. Here are some excellent options to consider.

    1. Scrambled Eggs: Serve with 2 scrambled eggs seasoned with salt and pepper for added protein and richness.
    2. Avocado Slices: Include half an avocado sliced; its creaminess pairs well with pancakes.
    3. Bacon Strips: Add 2-3 crispy bacon strips on the side for a savory contrast.
    4. Sautéed Spinach: Prepare 1 cup of sautéed spinach with olive oil for a nutritious green addition.
    5. Chia Seed Pudding: Pair with 1/2 cup of chia seed pudding topped with unsweetened coconut flakes as a refreshing side.
    6. Cucumber Salad: Serve with a simple cucumber salad made from 1 diced cucumber, lemon juice, and herbs for freshness.

    Common Mistakes to Avoid

    When making Keto Cottage Cheese Pancakes, it’s easy to make a few common errors. Here are some mistakes to steer clear of for the best results.

    • Using too much cottage cheese – Stick to 1 cup of cottage cheese for the right texture and flavor.
    • Overmixing the batter – Mix just until combined; overmixing can lead to tough pancakes.
    • Neglecting seasoning – A pinch of salt enhances flavors; limit it to 1/2 teaspoon for balance.
    • Not letting the batter rest – Allow the batter to rest for 5-10 minutes for fluffier pancakes.
    • Using cold ingredients – Always use room temperature eggs and cottage cheese for even cooking.

    Storage & Reheating Instructions

    Refrigerator Storage

    • Store pancakes in an airtight container.
    • They will last up to 5 days in the fridge.
    • Place parchment paper between layers to prevent sticking.

    Freezing Keto Cottage Cheese Pancakes

    • Freeze pancakes in a single layer on a baking sheet first.
    • Once frozen, transfer them to a freezer-safe bag or container.
    • They can be stored for up to 3 months in the freezer.

    Reheating Keto Cottage Cheese Pancakes

    • Oven – Preheat oven to 350°F (175°C) and heat pancakes for about 10 minutes until warm.
    • Microwave – Heat individual pancakes for 30 seconds on high or until warmed through.
    • Stovetop – Warm on a skillet over medium heat for about 2-3 minutes per side, flipping once.
    Keto

    Frequently Asked Questions

    What are Keto Cottage Cheese Pancakes?

    Keto Cottage Cheese Pancakes are low-carb pancakes made with cottage cheese, eggs, almond flour, and seasoning. They’re perfect for breakfast on a keto diet.

    Can I substitute ingredients in Keto Cottage Cheese Pancakes?

    Yes! You can replace almond flour with coconut flour (use only 1/4 cup), or add vanilla extract (1 teaspoon) for extra flavor.

    How do I know when my pancakes are done?

    Look for bubbles forming on the surface of the pancakes and edges that appear set. This usually takes about 2-3 minutes per side over medium heat.

    Are Keto Cottage Cheese Pancakes gluten-free?

    Yes, as long as you use gluten-free almond flour, these pancakes are entirely gluten-free!

    Can I make these pancakes ahead of time?

    Absolutely! You can prepare the batter ahead and store it in the fridge for up to 24 hours before cooking.

    Final Thoughts

    Keto Cottage Cheese Pancakes offer a delightful twist on traditional recipes while keeping your carb count low. Their versatility allows you to customize them with various toppings or mix-ins like berries or nuts. Give these delicious pancakes a try, and enjoy a satisfying breakfast that fits your dietary needs!

    Print

    Keto Cottage Cheese Pancakes

    5 Stars 4 Stars 3 Stars 2 Stars 1 Star

    No reviews

    Keto Cottage Cheese Pancakes are a delightful, low-carb breakfast option that combines the creamy goodness of cottage cheese with fluffy pancake perfection. Ideal for busy mornings, these pancakes are quick to make and can be customized with your favorite toppings. Enjoy them with fresh berries, a drizzle of sugar-free syrup, or a dollop of nut butter for a satisfying meal that won’t derail your keto diet. Packed with protein and healthy fats, they provide lasting energy without the carbs. Whether it’s a leisurely weekend brunch or a speedy weekday breakfast, these pancakes are sure to please the whole family!

    • Author: Diana
    • Prep Time: 10 minutes
    • Cook Time: 12 minutes
    • Total Time: 22 minutes
    • Yield: Approximately 6 pancakes 1x
    • Category: Breakfast
    • Method: Frying
    • Cuisine: Keto

    Ingredients

    Scale
    • 1 cup cottage cheese
    • 3 large eggs
    • 1/2 teaspoon baking powder
    • 1/4 teaspoon salt
    • 1/2 teaspoon vanilla extract
    • 1/4 cup almond flour
    • 1 tablespoon coconut oil (for cooking)

    Instructions

    1. In a mixing bowl, combine cottage cheese, eggs, baking powder, salt, and vanilla extract. Whisk until smooth.
    2. Gradually stir in almond flour until well mixed.
    3. Preheat a non-stick skillet over medium heat and add coconut oil.
    4. Pour about 1/4 cup of batter onto the skillet for each pancake. Cook for 3-4 minutes until bubbles form on top.
    5. Flip and cook for an additional 2-3 minutes until golden brown.
    6. Serve warm with your choice of toppings.

    Nutrition

    • Serving Size: 1 pancake (approximately 70g)
    • Calories: 140
    • Sugar: 3g
    • Sodium: 280mg
    • Fat: 8g
    • Saturated Fat: 5g
    • Unsaturated Fat: 3g
    • Trans Fat: 0g
    • Carbohydrates: 6g
    • Fiber: 2g
    • Protein: 10g
    • Cholesterol: 160mg

    Did you make this recipe?

    Share a photo and tag us — we can’t wait to see what you’ve made!

  • Gordon Ramsay Scrambled Eggs

    Gordon Ramsay Scrambled Eggs

    Gordon Ramsay Scrambled Eggs are a delightful dish perfect for breakfast, brunch, or a quick meal any time of day. This recipe shines with its creamy texture and rich flavor, making it a favorite among egg lovers. The unique cooking technique ensures that each bite is fluffy and satisfying. Whether you’re hosting guests or enjoying a quiet morning at home, these scrambled eggs are sure to impress.

    Why You’ll Love This Recipe

    • Quick and Easy: This recipe takes only 10 minutes to prepare, making it perfect for busy mornings.
    • Creamy Texture: The technique used results in ultra-creamy scrambled eggs that melt in your mouth.
    • Versatile Dish: Pair these eggs with toast, add them to a breakfast burrito, or serve them alongside your favorite sides.
    • Fresh Ingredients: Using fresh eggs and butter enhances the overall flavor profile, bringing out the best in this simple dish.

    Tools and Preparation

    To make Gordon Ramsay Scrambled Eggs, having the right tools is essential for achieving the perfect consistency. Here’s what you’ll need.

    Essential Tools and Equipment

    • Non-stick frying pan
    • Spatula
    • Mixing bowl
    • Whisk

    Importance of Each Tool

    • Non-stick frying pan: Ensures that the scrambled eggs cook evenly without sticking.
    • Spatula: Ideal for gently folding the eggs while cooking to maintain their fluffy texture.

    Ingredients

    For the Scrambled Eggs

    • 6 large eggs
    • 3 tablespoons unsalted butter
    • Salt to taste
    • Black pepper to taste

    For Serving

    • 4 slices of bread (for toast)
    • Chives (optional garnish)
    Gordon

    How to Make Gordon Ramsay Scrambled Eggs

    Step 1: Prepare the Eggs

    1. Crack 6 large eggs into a mixing bowl.
    2. Add a pinch of salt and some freshly cracked black pepper.
    3. Use a whisk to beat the eggs until combined but not overly frothy.

    Step 2: Heat the Pan

    1. Place your non-stick frying pan over medium heat.
    2. Add 3 tablespoons of unsalted butter, allowing it to melt and coat the pan evenly.

    Step 3: Cook the Eggs

    1. Pour the beaten eggs into the pan once the butter has melted.
    2. Let them sit undisturbed for about 20 seconds until they start to set.
    3. Gently stir with your spatula, pushing the eggs from the edge toward the center, creating soft folds.

    Step 4: Finish Cooking

    1. Remove from heat when they are still slightly runny; residual heat will finish cooking them.
    2. Taste and adjust seasoning with more salt and black pepper if desired.

    Step 5: Serve

    1. Toast your bread slices while finishing your eggs.
    2. Serve immediately on plates with toasted bread on the side.
    3. Garnish with chopped chives if desired for added flavor and presentation.

    Enjoy your delicious Gordon Ramsay Scrambled Eggs!

    How to Serve Gordon Ramsay Scrambled Eggs

    Gordon Ramsay Scrambled Eggs are a luxurious breakfast treat that can be enjoyed in various ways. Here are some serving suggestions to elevate your dish.

    On Toast

    • Sourdough Bread: Toast two slices of sourdough for a crunchy base.
    • Rye Bread: Use rye bread for a nutty flavor that complements the eggs well.

    With Fresh Herbs

    • Chives: Sprinkle 1 tablespoon of freshly chopped chives on top for a mild onion flavor.
    • Parsley: Add 1 tablespoon of parsley for a fresh, vibrant touch.

    With Garnishes

    • Crème Fraîche: A dollop (about 2 tablespoons) adds creaminess and tang.
    • Smoked Salmon: Top with 50 grams of smoked salmon for an upscale twist.

    How to Perfect Gordon Ramsay Scrambled Eggs

    To achieve the perfect Gordon Ramsay Scrambled Eggs, consider these essential tips.

    • Use Fresh Eggs: Always use the freshest eggs you can find for the best taste and texture.
    • Low Heat is Key: Cook your eggs on low heat to ensure they remain soft and creamy.
    • Stir Continuously: Keep stirring the eggs gently with a spatula to get that velvety consistency.
    • Add Butter Wisely: Incorporate 30 grams of unsalted butter during cooking for richness.
    • Season at the Right Time: Season with salt after cooking to prevent them from becoming watery.
    Gordon

    Best Side Dishes for Gordon Ramsay Scrambled Eggs

    Pairing side dishes with your scrambled eggs can enhance the meal experience. Here are some wonderful options.

    1. Avocado Toast: Creamy avocado on whole-grain toast, seasoned with salt and pepper.
    2. Grilled Tomatoes: Halve 2 medium tomatoes, grill until slightly charred, and serve warm.
    3. Bacon Strips: Crispy bacon (about 3 strips per person) adds savory crunch to the dish.
    4. Fruit Salad: A mix of seasonal fruits like berries and melons offers refreshing sweetness.
    5. Hash Browns: Crispy hash browns made from 250 grams of grated potatoes provide a delightful crunch.
    6. English Muffins: Toasted English muffins (1 per person) make a great base for toppings.

    Common Mistakes to Avoid

    When making Gordon Ramsay scrambled eggs, it’s easy to overlook some key details. Here are common mistakes to avoid for perfect results.

    • Using cold eggs – Start with eggs at room temperature for creamier texture. Let them sit out for about 15 minutes before cooking.
    • Overcooking the eggs – Cook gently over low heat to prevent rubbery texture. Aim for a soft, slightly runny finish.
    • Adding too much salt – Limit salt to 1/2 teaspoon per 4 eggs to maintain a balanced flavor without overpowering the dish.
    • Neglecting to whisk properly – Whisk until fully combined; this incorporates air that makes the eggs fluffy and light.
    • Skipping butter – Use at least 1 tablespoon of unsalted butter for richness. It enhances flavor and prevents sticking.

    Storage & Reheating Instructions

    Refrigerator Storage

    • Store Gordon Ramsay scrambled eggs in an airtight container.
    • They can be refrigerated for up to 3 days.

    Freezing Gordon Ramsay Scrambled Eggs

    • Freeze in a freezer-safe container or zip-top bag.
    • They can last up to 2 months in the freezer.

    Reheating Gordon Ramsay Scrambled Eggs

    • Oven – Preheat to 350°F (175°C) and cover eggs with foil, reheating for about 10-15 minutes until warm.
    • Microwave – Heat on medium power in short intervals of 30 seconds, stirring in between until warmed through.
    • Stovetop – Reheat gently in a non-stick pan over low heat, stirring frequently, until warmed.
    Gordon

    Frequently Asked Questions

    What makes Gordon Ramsay scrambled eggs unique?

    Gordon Ramsay’s scrambled eggs stand out due to the use of cream and gentle cooking techniques that create a creamy texture rather than traditional dry scrambled eggs.

    Can I customize the ingredients for my scrambled eggs?

    Absolutely! Add herbs like chives or parsley, cheese (about 1/4 cup), or even smoked salmon for a gourmet twist!

    How many servings does this recipe yield?

    This recipe typically serves 2-3 people, depending on portion sizes.

    What type of pan should I use for Gordon Ramsay scrambled eggs?

    A non-stick skillet is ideal. A heavy-bottomed pan helps distribute heat evenly, preventing the eggs from sticking.

    Can I make Gordon Ramsay scrambled eggs ahead of time?

    While best enjoyed fresh, you can prepare them ahead and store them as mentioned above. Just be aware that reheated scrambled eggs may lose some creaminess.

    Final Thoughts

    Gordon Ramsay scrambled eggs are a delightful breakfast choice that combines simplicity with gourmet flair. Their creamy texture and rich flavor make them versatile enough for various occasions. Feel free to customize with your favorite ingredients or sides to suit your taste!

    Print

    Gordon Ramsay Scrambled Eggs

    5 Stars 4 Stars 3 Stars 2 Stars 1 Star

    No reviews

    Gordon Ramsay Scrambled Eggs are a luxurious twist on a classic breakfast staple, delivering a creamy and fluffy texture that will elevate your morning routine.

    • Author: Diana
    • Prep Time: 5 minutes
    • Cook Time: 5 minutes
    • Total Time: 10 minutes
    • Yield: Serves 2
    • Category: Breakfast
    • Method: Frying
    • Cuisine: American

    Ingredients

    Scale
    • 6 large eggs
    • 3 tablespoons unsalted butter
    • Salt to taste
    • Black pepper to taste
    • 4 slices of bread (for toast)
    • Chives (optional garnish)

    Instructions

    1. Crack the eggs into a mixing bowl and add salt and pepper. Whisk until combined but not frothy.
    2. Heat a non-stick frying pan over medium heat and add the butter, melting it evenly.
    3. Pour the beaten eggs into the pan, letting them sit for about 20 seconds until they begin to set.
    4. Gently stir with a spatula, pushing the eggs from the edges toward the center until fluffy.
    5. Remove from heat while still slightly runny; residual heat will finish cooking them.
    6. Toast the bread while finishing the eggs. Serve immediately with toast on the side and garnish with chives if desired.

    Nutrition

    • Serving Size: 1 plate (approximately 200g)
    • Calories: 320
    • Sugar: 1g
    • Sodium: 400mg
    • Fat: 24g
    • Saturated Fat: 15g
    • Unsaturated Fat: 8g
    • Trans Fat: 0g
    • Carbohydrates: 16g
    • Fiber: 1g
    • Protein: 14g
    • Cholesterol: 560mg

    Did you make this recipe?

    Share a photo and tag us — we can’t wait to see what you’ve made!

  • Bisquick Donuts

    Bisquick Donuts

    Bisquick Donuts are a delightful treat that can brighten any occasion, from breakfast to dessert. These donuts are quick to prepare and require minimal effort, making them perfect for busy mornings or spontaneous gatherings. With their fluffy texture and sweet flavor, Bisquick Donuts stand out as a versatile snack that everyone will love.

    Why You’ll Love This Recipe

    • Quick and Easy: With Bisquick as the base, these donuts come together in no time, making them great for last-minute plans.
    • Customizable Toppings: You can easily top them with glaze, icing, or sprinkles to suit your taste and occasion.
    • No Special Equipment Needed: A simple mixing bowl and frying pan are all you need to create these delicious treats.
    • Perfect for All Ages: Kids and adults alike will enjoy these sweet delights; they are fun to make together!
    • Versatile Base: You can add chocolate chips, fruits, or spices to customize the flavor profile according to your preference.

    Tools and Preparation

    Before diving into the recipe, gather your tools and prepare your cooking space. This will ensure a smooth baking experience.

    Essential Tools and Equipment

    • Mixing bowl
    • Whisk
    • Frying pan
    • Slotted spoon
    • Cooling rack

    Importance of Each Tool

    • Mixing bowl: Essential for combining ingredients evenly without making a mess.
    • Whisk: Helps achieve a smooth batter by thoroughly mixing dry and wet ingredients.
    • Frying pan: Provides the perfect space for frying the donuts to achieve a crispy exterior.
    • Cooling rack: Allows the donuts to cool evenly after frying, preventing sogginess.

    Ingredients

    For the Donuts

    • 2 cups Bisquick mix
    • 1/4 cup granulated sugar
    • 1/2 teaspoon ground cinnamon
    • 1/2 cup milk
    • 1 large egg
    • 2 tablespoons vegetable oil

    For the Glaze

    • 1 cup powdered sugar
    • 2 tablespoons milk
    • 1 teaspoon vanilla extract
    Bisquick

    How to Make Bisquick Donuts

    Step 1: Prepare the Batter

    1. In a mixing bowl, combine 2 cups Bisquick mix, 1/4 cup granulated sugar, and 1/2 teaspoon ground cinnamon. Whisk together until well combined.
    2. Add in 1/2 cup milk, 1 large egg, and 2 tablespoons vegetable oil. Mix until you achieve a smooth batter.

    Step 2: Heat the Oil

    1. In a frying pan, pour enough oil to fill about 1 inch deep. Heat over medium heat until hot but not smoking.

    Step 3: Fry the Donuts

    1. Using a spoon or donut cutter, carefully drop batter into the hot oil, forming circular shapes.
    2. Fry each donut for about 2-3 minutes on each side or until golden brown.
    3. Remove with a slotted spoon and place on a cooling rack.

    Step 4: Prepare the Glaze

    1. In a small bowl, whisk together 1 cup powdered sugar, 2 tablespoons milk, and 1 teaspoon vanilla extract until smooth.

    Step 5: Glaze the Donuts

    1. Once cooled slightly, dip each donut into the glaze while it’s still warm.
    2. Set aside on a plate until the glaze firms up slightly before serving. Enjoy your homemade Bisquick Donuts!

    How to Serve Bisquick Donuts

    Serving Bisquick donuts can be a delightful experience, enhancing their flavor and presentation. Here are some creative serving suggestions to elevate your donut game.

    Classic Glaze

    • Simple Sugar Glaze: Mix 1 cup of powdered sugar with 2 tablespoons of milk for a sweet glaze.
    • Chocolate Drizzle: Melt ½ cup of chocolate chips and drizzle over the donuts for a decadent touch.

    Toppings Galore

    • Sprinkles: Add colorful sprinkles on top of the glaze for a festive look.
    • Coconut Flakes: Roll the donuts in shredded coconut for a tropical twist.

    Pairing with Beverages

    • Coffee: Serve your Bisquick donuts with a fresh cup of coffee for a classic breakfast combo.
    • Milk: A glass of cold milk complements the sweetness perfectly.

    How to Perfect Bisquick Donuts

    Perfecting your Bisquick donuts is easy with these helpful tips. Follow these guidelines for the best results.

    • Use Fresh Ingredients: Ensure that your Bisquick mix is fresh for optimal rise and texture.
    • Don’t Overmix: Mix just until combined to keep the donuts light and fluffy.
    • Adjust Temperature: Fry at 350°F (175°C) to ensure evenly cooked donuts without burning.
    • Experiment with Flavors: Add spices like cinnamon or nutmeg (1 teaspoon each) to enhance flavor.
    • Use a Thermometer: Check oil temperature with a thermometer for perfect frying results.
    Bisquick

    Best Side Dishes for Bisquick Donuts

    Pairing side dishes with your Bisquick donuts can create a well-rounded meal. Here are some great options to consider.

    1. Fruit Salad: A refreshing mix of seasonal fruits adds color and nutrition.
    2. Yogurt Parfait: Layer yogurt, granola, and berries for a creamy and crunchy side.
    3. Scrambled Eggs: The savory flavor balances out the sweetness of the donuts nicely.
    4. Bacon Strips: Crispy bacon adds a salty contrast that complements the sweet taste.
    5. Oatmeal: A warm bowl of oatmeal provides heartiness alongside your donuts.
    6. Smoothie Bowl: Blend frozen fruits into a smoothie and top with nuts and seeds for added texture.

    Common Mistakes to Avoid

    Making Bisquick Donuts can be simple, but a few common mistakes can lead to less-than-perfect results. Here are some tips to ensure your donuts turn out fantastic.

    • Incorrect measurements – Using the wrong quantities of Bisquick can affect texture. Stick to 2 cups for best results.
    • Overmixing the batter – Mixing too much can make the donuts tough. Mix just until combined for a light texture.
    • Not letting the dough rest – Skipping this step can result in dense donuts. Allow the dough to rest for at least 10 minutes before cooking.
    • Using too high heat – Cooking at temperatures above 350°F can burn the outside while leaving the inside raw. Keep your oil or oven temperature consistent.
    • Skipping the toppings – Plain donuts can be bland. Don’t forget to add glaze or sugar for flavor!

    Storage & Reheating Instructions

    Refrigerator Storage

    • Store leftover Bisquick Donuts in an airtight container.
    • They will last for up to 3 days in the refrigerator.

    Freezing Bisquick Donuts

    • Place cooled donuts in a freezer-safe bag or container.
    • They can be frozen for up to 2 months.

    Reheating Bisquick Donuts

    • Oven – Preheat oven to 350°F and warm donuts for about 5-7 minutes for a fresh taste.
    • Microwave – Heat on medium power for 10-15 seconds, but be cautious not to overdo it, as they may become tough.
    • Stovetop – Place in a skillet over low heat, flipping occasionally, until warmed through.
    Bisquick

    Frequently Asked Questions

    What are Bisquick Donuts?

    Bisquick Donuts are quick and easy donuts made using Bisquick mix instead of traditional flour. They’re fluffy and delicious!

    How do I customize my Bisquick Donuts?

    You can add flavors like vanilla extract (1 teaspoon) or spices like cinnamon (1 teaspoon) for added flavor. Toppings such as chocolate glaze or powdered sugar are also great options.

    Can I use other flours instead of Bisquick?

    Yes, you can use all-purpose flour, but you’ll need to adjust the leavening agents accordingly. For every cup of flour, add about 2 teaspoons of baking powder.

    How long do Bisquick Donuts last?

    When stored properly in an airtight container, they last up to 3 days in the fridge and up to 2 months in the freezer.

    Are there any gluten-free options for Bisquick Donuts?

    Yes, you can use gluten-free Bisquick mix as a substitute. Follow the same recipe instructions for delicious gluten-free donuts.

    Final Thoughts

    Bisquick Donuts are not only quick and easy to make but also incredibly versatile. You can customize them with various flavors and toppings, making them perfect for any occasion. Give this recipe a try and enjoy these delightful treats!

    Print

    Bisquick Donuts

    5 Stars 4 Stars 3 Stars 2 Stars 1 Star

    No reviews

    Discover the joy of making Bisquick Donuts, a delightful treat that can elevate any occasion, from breakfast to dessert. These fluffy donuts are incredibly easy to whip up, making them perfect for busy mornings or unexpected gatherings. With just a few simple ingredients and minimal effort, you can enjoy warm, sweet donuts topped with your favorite glaze or sprinkles. The versatility of this recipe allows for endless flavor combinations, ensuring that everyone in the family will find a favorite. Whether served alongside coffee or milk, these Bisquick Donuts are bound to become a go-to recipe in your kitchen.

    • Author: Diana
    • Prep Time: 10 minutes
    • Cook Time: 10 minutes
    • Total Time: 20 minutes
    • Yield: Approximately 12 servings 1x
    • Category: Dessert
    • Method: Frying
    • Cuisine: American

    Ingredients

    Scale
    • 2 cups Bisquick mix
    • 1/4 cup granulated sugar
    • 1/2 teaspoon ground cinnamon
    • 1/2 cup milk
    • 1 large egg
    • 2 tablespoons vegetable oil
    • For the glaze: 1 cup powdered sugar
    • 2 tablespoons milk
    • 1 teaspoon vanilla extract

    Instructions

    1. In a mixing bowl, combine 2 cups Bisquick mix, 1/4 cup granulated sugar, and 1/2 teaspoon ground cinnamon. Whisk until blended.
    2. Add 1/2 cup milk, 1 large egg, and 2 tablespoons vegetable oil to the dry ingredients. Stir until smooth.
    3. Heat oil in a frying pan over medium heat until hot but not smoking.
    4. Drop spoonfuls of batter into the hot oil, frying each donut for about 2-3 minutes per side or until golden brown.
    5. Remove donuts with a slotted spoon and place on a cooling rack.
    6. For the glaze: whisk together 1 cup powdered sugar, 2 tablespoons milk, and 1 teaspoon vanilla extract in a small bowl until smooth.
    7. Dip each slightly cooled donut into the glaze and set aside to firm up before serving.

    Nutrition

    • Serving Size: 1 donut (approximately 40g)
    • Calories: 150
    • Sugar: 9g
    • Sodium: 142mg
    • Fat: 7g
    • Saturated Fat: 0.5g
    • Unsaturated Fat: 5g
    • Trans Fat: 0g
    • Carbohydrates: 20g
    • Fiber: <1g
    • Protein: 2g
    • Cholesterol: 18mg

    Did you make this recipe?

    Share a photo and tag us — we can’t wait to see what you’ve made!

  • Salted Caramel Banana Bread

    Salted Caramel Banana Bread

    Salted Caramel Banana Bread is an indulgent treat that combines the sweetness of ripe bananas with rich salted caramel. This delightful loaf is perfect for breakfast, dessert, or a snack, making it a versatile addition to any occasion. With its moist texture and heavenly flavor, this bread will surely become a favorite in your household.

    Why You’ll Love This Recipe

    • Delicious Flavor: The combination of bananas and salted caramel creates a unique taste that’s hard to resist.
    • Easy to Make: With simple ingredients and straightforward steps, even novice bakers can master this recipe.
    • Versatile: Enjoy it warm with butter or serve it as a dessert with ice cream; the options are endless!
    • Perfectly Moist: Ripe bananas ensure that each slice is incredibly moist and flavorful.
    • Great for Sharing: Bake this loaf for gatherings or as gifts; everyone will love a slice of this delightful bread!

    Tools and Preparation

    To make Salted Caramel Banana Bread, you’ll need some essential tools to ensure the process goes smoothly. Having the right equipment on hand makes baking more enjoyable.

    Essential Tools and Equipment

    • Mixing bowl
    • Loaf pan
    • Measuring cups
    • Measuring spoons
    • Whisk

    Importance of Each Tool

    • Mixing bowl: A large mixing bowl is crucial for combining ingredients without spilling.
    • Loaf pan: A good-quality loaf pan ensures even baking and easy removal of the bread once it’s done.
    • Measuring cups: Accurate measurements lead to consistent results every time you bake.

    Ingredients

    For the Banana Bread

    • 3 ripe bananas (mashed)
    • 1/2 cup unsalted butter (melted)
    • 1 cup granulated sugar
    • 2 large eggs
    • 1 teaspoon vanilla extract
    • 1 teaspoon baking soda
    • 1/2 teaspoon salt
    • 1 1/2 cups all-purpose flour

    For the Salted Caramel Topping

    • 1 cup brown sugar
    • 1/2 cup heavy cream
    • 4 tablespoons unsalted butter
    • 1 teaspoon sea salt
    Salted

    How to Make Salted Caramel Banana Bread

    Step 1: Prepare Your Oven and Pan

    Preheat your oven to 350°F (175°C). Grease a loaf pan with butter or non-stick spray to prevent sticking.

    Step 2: Mix Wet Ingredients

    In a mixing bowl, combine the mashed bananas and melted butter. Stir until well mixed. Add in the sugar, eggs, and vanilla extract. Whisk until smooth.

    Step 3: Combine Dry Ingredients

    In a separate bowl, whisk together the flour, baking soda, and salt. Gradually add the dry mixture into the wet mixture, stirring gently until just combined.

    Step 4: Bake the Bread

    Pour the batter into the prepared loaf pan. Bake in the preheated oven for 55-65 minutes or until a toothpick inserted into the center comes out clean. Let cool in the pan for about 10 minutes before transferring to a wire rack.

    Step 5: Prepare Salted Caramel Sauce

    In a saucepan over medium heat, combine brown sugar, heavy cream, and butter. Stir continuously until it boils. Allow it to simmer for about 5 minutes. Remove from heat and stir in sea salt.

    Step 6: Drizzle Caramel Over Bread

    Once your banana bread has cooled slightly, drizzle warm salted caramel sauce over the top before slicing. Serve warm or at room temperature!

    How to Serve Salted Caramel Banana Bread

    Salted Caramel Banana Bread is a delightful treat that can be enjoyed in various ways. Whether you are serving it for breakfast, dessert, or a snack, these serving suggestions will enhance your experience.

    Warm with Butter

    • Spread a pat of butter: Serve slices warm with a pat of butter melting into the bread for extra richness.

    Topped with Ice Cream

    • Combine with vanilla ice cream: A scoop of creamy vanilla ice cream pairs perfectly, adding a delicious contrast to the warm banana bread.

    Drizzled with Extra Caramel

    • Add more salted caramel sauce: Drizzle extra salted caramel sauce on top for those who love an indulgent touch.

    With Fresh Fruits

    • Serve alongside sliced bananas or berries: Fresh fruits like strawberries or blueberries add a refreshing balance to the sweet flavors.

    As Part of a Brunch Spread

    • Include in a brunch buffet: Slice up the banana bread and serve it as part of a larger brunch spread with other pastries and fruits.

    How to Perfect Salted Caramel Banana Bread

    Perfecting Salted Caramel Banana Bread requires attention to detail. Here are some tips to ensure your loaf turns out just right.

    • Use ripe bananas: For the best flavor, use 3-4 very ripe bananas; their sweetness enhances the taste of the bread.
    • Measure flour accurately: Spoon and level 2 cups of all-purpose flour to avoid dense bread.
    • Don’t overmix the batter: Mix until just combined; this keeps your banana bread light and fluffy.
    • Add chopped nuts for texture: Incorporate 1/2 cup of chopped walnuts or pecans for added crunch and flavor.
    • Cool before slicing: Allow the bread to cool in the pan for 10 minutes before transferring to a wire rack; this helps maintain its shape.
    • Store properly: Keep leftover banana bread wrapped in plastic wrap at room temperature for up to 3 days or freeze for longer storage.
    Salted

    Best Side Dishes for Salted Caramel Banana Bread

    Salted Caramel Banana Bread can be complemented by various side dishes. These pairings will enhance your meal while keeping the focus on this delicious bread.

    1. Greek Yogurt Parfait: Layer Greek yogurt with granola and mixed berries for a healthy and refreshing side.
    2. Fruit Salad: A vibrant fruit salad adds freshness; mix seasonal fruits like melons, apples, and grapes.
    3. Coffee or Tea: A warm cup of coffee or tea brings out the flavors in banana bread beautifully.
    4. Cheese Platter: Pair with soft cheeses like brie or cream cheese to create an interesting flavor combination.
    5. Honey Butter Spread: Whip together 1/4 cup softened butter with 2 tablespoons honey for a sweet spread option.
    6. Chocolate Dipped Strawberries: These sweet treats add elegance; simply dip fresh strawberries in melted chocolate and let them set.

    Common Mistakes to Avoid

    Making Salted Caramel Banana Bread can be delightful, but there are some common pitfalls to watch out for.

    • Using overripe bananas – While ripe bananas are essential, overly mushy ones can make the bread too dense. Aim for 3 medium-sized ripe bananas.
    • Adding too much salt – To maintain the balance of flavors, limit your salt to 1/2 teaspoon.
    • Not measuring flour accurately – Using too much flour can lead to dry bread. Always spoon and level your flour for about 2 cups.
    • Skipping the caramel sauce – The salted caramel is what makes this recipe special. Don’t omit it; use at least 1 cup of homemade or store-bought salted caramel.
    • Not checking for doneness – To avoid undercooked bread, insert a toothpick into the center; it should come out clean when fully baked.

    Storage & Reheating Instructions

    Refrigerator Storage

    • Store in an airtight container for up to 5 days.
    • Keep in the original baking pan, covered tightly with plastic wrap.

    Freezing Salted Caramel Banana Bread

    • Wrap slices in plastic wrap and place them in a freezer-safe bag.
    • Can be stored for up to 3 months.

    Reheating Salted Caramel Banana Bread

    • Oven – Preheat to 350°F (175°C). Wrap the bread in foil and heat for about 10-15 minutes.
    • Microwave – Place a slice on a microwave-safe plate and heat for 15-20 seconds.
    • Stovetop – Place a slice in a skillet over low heat, cover, and warm for about 5 minutes.
    Salted

    Frequently Asked Questions

    What makes Salted Caramel Banana Bread different from regular banana bread?

    Salted Caramel Banana Bread includes rich salted caramel swirled throughout, adding a unique sweet-salty flavor that elevates the traditional recipe.

    Can I substitute ingredients in Salted Caramel Banana Bread?

    Yes! You can use coconut oil instead of butter (1/2 cup) or almond milk (1 cup) as a dairy-free option.

    How long does it take to bake Salted Caramel Banana Bread?

    It typically takes about 60-70 minutes at 350°F (175°C). Always check with a toothpick for doneness.

    Can I add nuts or chocolate chips to the bread?

    Absolutely! Feel free to mix in up to 1 cup of nuts or chocolate chips for added texture and flavor.

    Is it possible to make mini loaves of Salted Caramel Banana Bread?

    Yes! Divide the batter into mini loaf pans and reduce baking time to about 30-40 minutes.

    Final Thoughts

    Salted Caramel Banana Bread is not only delicious but also versatile. You can customize it with nuts or chocolate chips according to your preference. Give this recipe a try; your taste buds will thank you!

    Print

    Salted Caramel Banana Bread

    5 Stars 4 Stars 3 Stars 2 Stars 1 Star

    No reviews

    Indulge in the luxurious flavors of Salted Caramel Banana Bread, where the sweetness of ripe bananas meets rich, creamy salted caramel. This moist and decadent loaf is not just perfect for breakfast; it makes for an irresistible dessert or a delightful snack any time of the day. With simple ingredients and straightforward steps, even novice bakers can master this recipe. Enjoy it warm with butter, topped with ice cream, or drizzled with extra caramel sauce for a truly indulgent experience. Whether you’re sharing at a gathering or savoring it alone, this banana bread will quickly become a favorite.

    • Author: Diana
    • Prep Time: 15 minutes
    • Cook Time: 60 minutes
    • Total Time: 1 hour 15 minutes
    • Yield: Approximately 12 servings 1x
    • Category: Dessert
    • Method: Baking
    • Cuisine: American

    Ingredients

    Scale
    • 3 ripe bananas (mashed)
    • 1/2 cup unsalted butter (melted)
    • 1 cup granulated sugar
    • 2 large eggs
    • 1 teaspoon vanilla extract
    • 1 teaspoon baking soda
    • 1/2 teaspoon salt
    • 1 1/2 cups all-purpose flour
    • 1 cup brown sugar
    • 1/2 cup heavy cream
    • 4 tablespoons unsalted butter
    • 1 teaspoon sea salt

    Instructions

    1. Preheat your oven to 350°F (175°C). Grease a loaf pan with butter or non-stick spray.
    2. In a mixing bowl, combine mashed bananas and melted butter until smooth. Add sugar, eggs, and vanilla; whisk until well combined.
    3. In another bowl, whisk together flour, baking soda, and salt. Gradually fold the dry mixture into the wet mixture until just combined.
    4. Pour batter into the prepared loaf pan and bake for 55-65 minutes until a toothpick comes out clean. Let cool in the pan for 10 minutes before transferring to a wire rack.
    5. For the salted caramel topping, combine brown sugar, heavy cream, and butter in a saucepan over medium heat. Stir until boiling; simmer for about 5 minutes before stirring in sea salt.
    6. Drizzle warm salted caramel over the cooled banana bread before slicing.

    Nutrition

    • Serving Size: 1 slice (70g)
    • Calories: 250
    • Sugar: 21g
    • Sodium: 200mg
    • Fat: 10g
    • Saturated Fat: 6g
    • Unsaturated Fat: 4g
    • Trans Fat: 0g
    • Carbohydrates: 37g
    • Fiber: 1g
    • Protein: 3g
    • Cholesterol: 45mg

    Did you make this recipe?

    Share a photo and tag us — we can’t wait to see what you’ve made!

  • Bisquick Chicken Pot Pie

    Bisquick Chicken Pot Pie

    Bisquick Chicken Pot Pie is a comforting dish that brings together the warmth of home-cooked meals with the convenience of quick preparation. Perfect for family dinners or gatherings, this recipe stands out for its ease of preparation and delightful flavor. With a rich filling and a fluffy Bisquick topping, it’s sure to please everyone at the table.

    Why You’ll Love This Recipe

    • Quick and Easy: This recipe comes together in about 30 minutes, making it perfect for busy weeknights.
    • Delicious Comfort Food: Enjoy a classic pot pie that is both hearty and satisfying, ideal for chilly evenings.
    • Versatile Ingredients: Feel free to customize the filling with your favorite vegetables or protein options.
    • Family-Friendly: Kids and adults alike will love the creamy chicken mixture topped with a golden crust.

    Tools and Preparation

    Gathering the right tools will help you make this dish effortlessly. Here’s what you’ll need:

    Essential Tools and Equipment

    • 9-inch pie pan
    • Mixing bowl
    • Whisk
    • Cooking spoon
    • Oven mitts

    Importance of Each Tool

    • 9-inch pie pan: This is essential for holding your pot pie while it bakes to golden perfection.
    • Mixing bowl: A large mixing bowl is necessary for combining your ingredients evenly.
    • Whisk: Use a whisk to ensure that all ingredients are well-blended, especially when preparing the filling.

    Ingredients

    For the Filling

    • 2 cups cooked shredded chicken
    • 1 cup frozen mixed vegetables (peas, carrots, corn)
    • 1/2 cup milk
    • 1 can (10.5 ounces) cream of chicken soup
    • 1 teaspoon garlic powder
    • Salt and black pepper to taste

    For the Topping

    • 1 1/2 cups Bisquick mix
    • 3/4 cup milk
    • 3 large eggs
    Bisquick

    How to Make Bisquick Chicken Pot Pie

    Step 1: Prepare the Filling

    1. In a mixing bowl, combine 2 cups cooked shredded chicken, 1 cup frozen mixed vegetables, 1/2 cup milk, and 1 can cream of chicken soup.
    2. Add in 1 teaspoon garlic powder, along with salt and black pepper to taste. Mix until well combined.

    Step 2: Assemble the Pie

    1. Pour the filling mixture into a greased 9-inch pie pan, spreading it evenly across the base.

    Step 3: Make the Topping

    1. In another bowl, whisk together 1 1/2 cups Bisquick mix, 3/4 cup milk, and 3 large eggs. Ensure there are no lumps in the batter.

    Step 4: Bake

    1. Pour the Bisquick topping over the filling in the pie pan.
    2. Bake in a preheated oven at 400°F (200°C) for about 30 minutes or until the top is golden brown.

    Enjoy your delicious homemade Bisquick Chicken Pot Pie!

    How to Serve Bisquick Chicken Pot Pie

    Serving Bisquick Chicken Pot Pie can elevate your dining experience. This comforting dish pairs well with various sides and garnishes that enhance its flavors.

    Classic Pairings

    • Green Salad: A fresh green salad with mixed greens, cherry tomatoes, and a light vinaigrette balances the richness of the pot pie.
    • Garlic Bread: Warm garlic bread made with 1 loaf of French bread, butter, and minced garlic offers a crunchy contrast to the soft pie.

    Additional Toppings

    • Chopped Fresh Herbs: Sprinkle chopped parsley or thyme on top for a burst of freshness.
    • Grated Cheese: Add shredded cheddar cheese (about 1 cup) on top before baking for an extra cheesy flavor.

    Seasonal Variations

    • Cranberry Sauce: A small side of cranberry sauce complements the savory flavors with a hint of sweetness, especially during fall.
    • Steamed Vegetables: Serve steamed broccoli or carrots seasoned with a pinch of salt to add color and nutrients to your meal.

    How to Perfect Bisquick Chicken Pot Pie

    To perfect your Bisquick Chicken Pot Pie, consider these helpful tips. They will ensure your dish is delicious every time you make it.

    • Use cooked chicken: Start with about 2 cups of shredded rotisserie chicken for a faster prep time and great flavor.
    • Add veggies: Incorporate 1 cup of frozen mixed vegetables or 1 cup of diced fresh vegetables like carrots and peas for added texture.
    • Season well: Don’t forget to season your filling with 1 teaspoon of salt and ½ teaspoon of black pepper for optimal taste.
    • Adjust baking time: Keep an eye on the pie while baking; it should be golden brown on top after about 30 minutes at 400°F (200°C).
    • Let it cool slightly: Allow the pot pie to rest for about 10 minutes after baking. This helps the filling set and makes serving easier.
    • Experiment with spices: Try adding a pinch of paprika or cayenne pepper (¼ teaspoon) for extra warmth in your filling.
    Bisquick

    Best Side Dishes for Bisquick Chicken Pot Pie

    Choosing the right side dishes can make your meal even more enjoyable. Here are some excellent options that pair nicely with Bisquick Chicken Pot Pie.

    1. Mashed Potatoes: Creamy mashed potatoes made from 4 large potatoes, butter, and cream provide a hearty side that complements the pie’s flavors.
    2. Coleslaw: A refreshing coleslaw made from 4 cups of shredded cabbage and carrots tossed in a tangy dressing adds crunch to your plate.
    3. Corn on the Cob: Boil or grill fresh corn on the cob (about 4 ears) for a sweet and juicy addition to your meal.
    4. Roasted Brussels Sprouts: Toss halved Brussels sprouts (about 1 pound) in olive oil, salt, and pepper, then roast until crispy for a nutritious side.
    5. Baked Beans: Sweet baked beans provide a comforting contrast; use about 2 cups from a can or homemade recipe.
    6. Fruit Salad: A light fruit salad made from berries and melon adds a refreshing touch; mix around 2 cups total for balance.

    Common Mistakes to Avoid

    Making Bisquick Chicken Pot Pie can be simple, but there are common mistakes that can ruin the dish. Here are some pitfalls to watch out for:

    • Using too much chicken – While chicken is essential, using more than 2 cups may overwhelm the other flavors.
    • Neglecting seasoning – Forgetting to add salt can make your pot pie bland. Aim for about 1 teaspoon of salt for balance.
    • Overmixing the batter – Mix the Bisquick batter just until combined; overmixing can lead to a tough crust.
    • Skipping the vegetables – Leaving out vegetables like carrots (1 cup diced) or peas (1 cup) will reduce flavor and nutrition.
    • Not pre-cooking chicken – Using raw chicken can lead to uneven cooking. Always use 2 cups of cooked, shredded chicken.

    Storage & Reheating Instructions

    Refrigerator Storage

    • Store leftover Bisquick Chicken Pot Pie in an airtight container for up to 3 days.
    • Allow the dish to cool completely before sealing it in a container.

    Freezing Bisquick Chicken Pot Pie

    • Freeze individual portions or whole pies wrapped tightly in plastic wrap and then aluminum foil.
    • It can last in the freezer for up to 3 months.

    Reheating Bisquick Chicken Pot Pie

    • Oven – Preheat to 350°F (175°C) and bake for about 20-25 minutes or until heated through.
    • Microwave – Heat on high for 2-3 minutes, checking every minute until hot.
    • Stovetop – Place in a skillet over medium heat, cover, and cook for about 10 minutes, stirring occasionally.
    Bisquick

    Frequently Asked Questions

    What is Bisquick Chicken Pot Pie?

    Bisquick Chicken Pot Pie is a quick and easy dish made with cooked chicken, vegetables, and a simple Bisquick batter that forms a flaky crust when baked.

    Can I use frozen vegetables in Bisquick Chicken Pot Pie?

    Yes! You can substitute fresh vegetables with about 2 cups of frozen mixed vegetables. Just thaw them before adding them to the mixture.

    How do I make Bisquick Chicken Pot Pie gluten-free?

    To make this recipe gluten-free, use a gluten-free Bisquick mix and ensure all other ingredients are gluten-free.

    How long does it take to bake Bisquick Chicken Pot Pie?

    The baking time is typically around 30 minutes at 400°F (200°C), or until the top is golden brown and cooked through.

    Can I customize my Bisquick Chicken Pot Pie?

    Absolutely! Feel free to add herbs like thyme or rosemary, or swap out chicken for turkey or beef depending on your preference!

    Final Thoughts

    Bisquick Chicken Pot Pie is not only comforting but also versatile. You can easily customize it with your favorite proteins and veggies. Try this delicious recipe today for a fulfilling meal that’s sure to please everyone at your table!

    Print

    Bisquick Chicken Pot Pie

    5 Stars 4 Stars 3 Stars 2 Stars 1 Star

    No reviews

    Indulge in the comforting delight of Bisquick Chicken Pot Pie, a quick and hearty dish perfect for busy weeknights or family gatherings. This recipe combines tender shredded chicken and vibrant mixed vegetables enveloped in a creamy filling, all topped with a fluffy Bisquick crust that bakes to golden perfection. With minimal prep time and maximum flavor, you can enjoy a homemade meal that pleases both kids and adults alike. Customize it with your favorite veggies or proteins for an added twist.

    • Author: Diana
    • Prep Time: 10 minutes
    • Cook Time: 30 minutes
    • Total Time: 40 minutes
    • Yield: Serves approximately 6
    • Category: Main
    • Method: Baking
    • Cuisine: American

    Ingredients

    Scale
    • 2 cups cooked shredded chicken
    • 1 cup frozen mixed vegetables (peas, carrots, corn)
    • 1/2 cup milk
    • 1 can (10.5 ounces) cream of chicken soup
    • 1 teaspoon garlic powder
    • Salt and black pepper to taste
    • 1 1/2 cups Bisquick mix
    • 3/4 cup milk (for topping)
    • 3 large eggs

    Instructions

    1. Preheat your oven to 400°F (200°C).
    2. In a mixing bowl, combine the cooked shredded chicken, frozen mixed vegetables, 1/2 cup milk, cream of chicken soup, garlic powder, salt, and pepper. Mix well.
    3. Pour the filling into a greased 9-inch pie pan.
    4. In another bowl, whisk together the Bisquick mix, 3/4 cup milk, and eggs until smooth.
    5. Pour the Bisquick topping over the chicken filling in the pie pan.
    6. Bake for about 30 minutes or until the top is golden brown.

    Nutrition

    • Serving Size: 1 slice (approx. 200g)
    • Calories: 320
    • Sugar: 3g
    • Sodium: 680mg
    • Fat: 14g
    • Saturated Fat: 4g
    • Unsaturated Fat: 8g
    • Trans Fat: 0g
    • Carbohydrates: 36g
    • Fiber: 2g
    • Protein: 18g
    • Cholesterol: 120mg

    Did you make this recipe?

    Share a photo and tag us — we can’t wait to see what you’ve made!