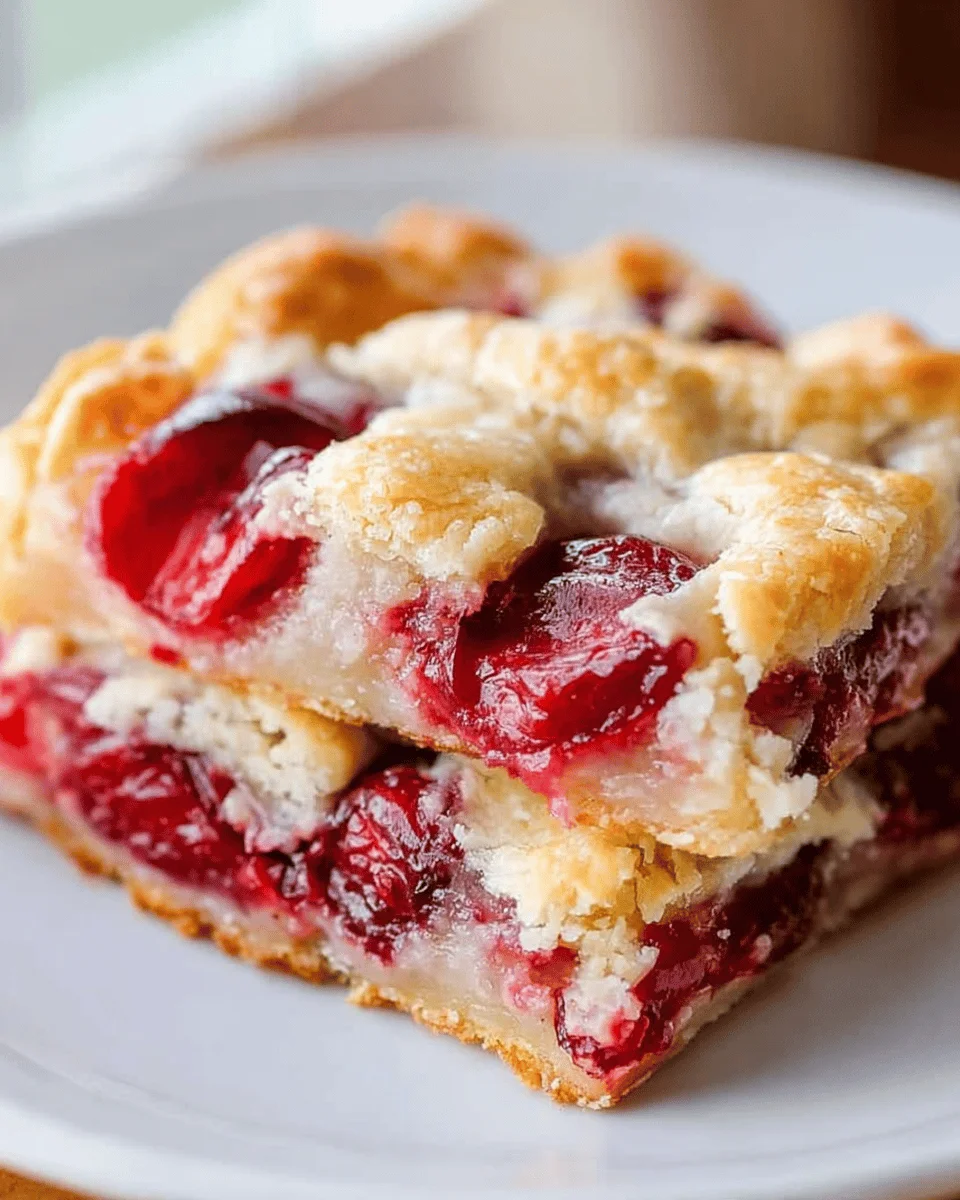
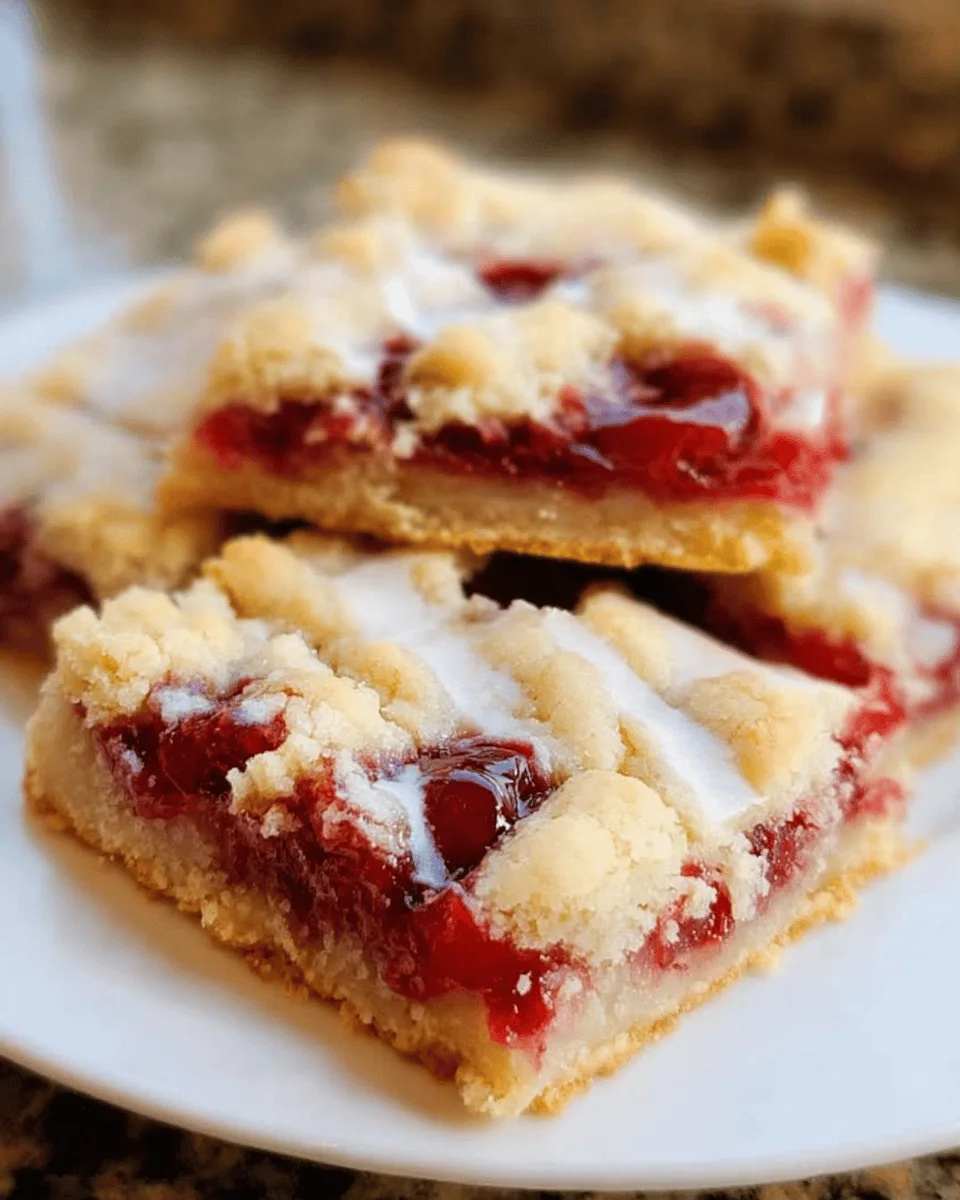
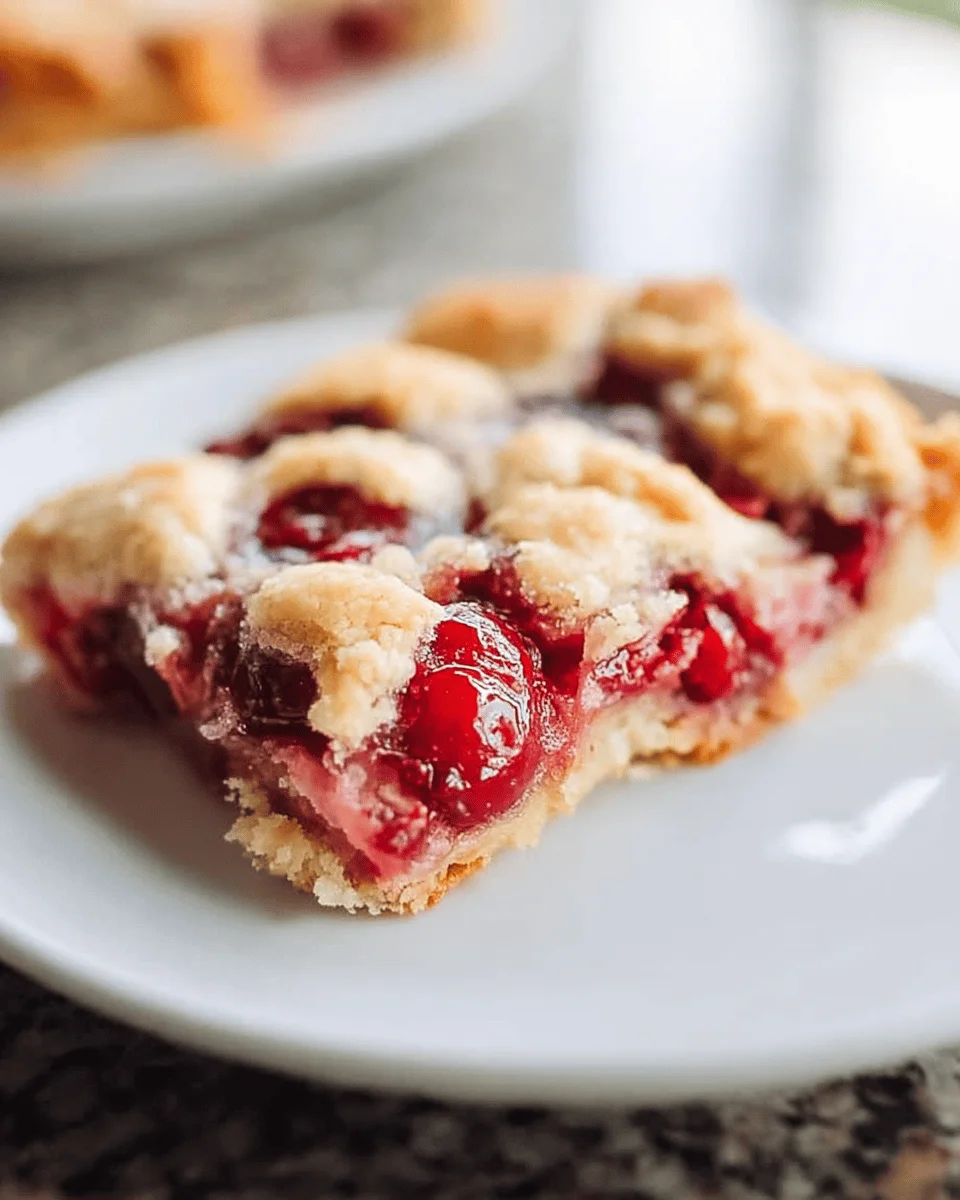
These Cherry Pie Bars are a delightful treat that captures the essence of homemade desserts. Perfect for any occasion, these bars are not only visually appealing but also incredibly easy to prepare. With a sweet cherry filling nestled between buttery layers, they offer a delicious balance of flavor and texture. Whether you’re serving them at a family gathering or enjoying them as an afternoon snack, these bars are sure to impress!
Why You’ll Love This Recipe
- Easy to Make: With simple ingredients and straightforward steps, anyone can whip up these bars in no time.
- Versatile Flavor: While cherry is the star here, feel free to experiment with other pie fillings to suit your taste.
- Perfect for Sharing: Cut into squares, these bars are ideal for parties, potlucks, or just enjoying with friends and family.
- Make Ahead Option: These cherry pie bars store well, making them perfect for prepping in advance for special occasions.
- Kid-Friendly Fun: Involve the little ones in making these bars; it’s a great way to bond over baking!
Tools and Preparation
To create these delicious Cherry Pie Bars, you’ll need some essential kitchen tools that help streamline the process.
Essential Kitchen Tools
- 15x10x1-inch baking pan
- Mixing bowls
- Electric mixer
- Rubber spatula
- Measuring cups and spoons
Why These Tools Matter
- 15x10x1-inch baking pan: This size allows for even cooking and the perfect thickness for your bars.
- Electric mixer: Saves time and effort when creaming butter and sugar together.
- Rubber spatula: Perfect for scraping down the sides of bowls and ensuring no ingredients are left behind.
Ingredients
These cherry pie bars are tasty and pretty! A homemade dessert that is easy to make and slices up and serves perfectly. Use any pie filling!
For the Base
- 1 cup unsalted butter (2 sticks), softened to room temperature
- 2 cups sugar
- 1 teaspoon salt
- 4 large eggs
- 1 teaspoon vanilla extract
- 1/4 teaspoon almond extract
- 3 cups all-purpose flour
For the Filling
- 2 (21 ounce) cans cherry pie filling
For the Drizzle
- 1 cup powdered sugar
- 1/2 teaspoon vanilla extract
- 1/2 teaspoon almond extract
- 2-3 Tablespoons milk
How to Make Cherry Pie Bars
Step 1: Preheat the Oven
Preheat your oven to 350°F (175°C). This ensures that your bars bake evenly.
Step 2: Cream Butter and Sugar
In a large bowl, cream together:
1. 1 cup unsalted butter (softened)
2. 2 cups sugar
3. 1 teaspoon salt
Beat until the mixture is light and fluffy.
Step 3: Add Eggs and Extracts
Add eggs one at a time:
1. Beat well after each addition.
2. Mix in 1 teaspoon vanilla extract and 1/4 teaspoon almond extract.
Step 4: Incorporate Flour
Gradually add:
– 3 cups all-purpose flour
Mix until fully combined.
Step 5: Assemble in Baking Pan
Spread half of the dough into a greased 15x10x1-inch baking pan evenly.
Then:
– Spread 2 (21 ounce) cans cherry pie filling evenly on top.
– Drop remaining dough by teaspoonfuls over filling.
Step 6: Bake the Bars
Bake in preheated oven for about:
– 30–35 minutes or until golden brown.
Once done, cool completely in the pan on a wire rack.
Step 7: Prepare the Drizzle
In a small bowl, mix together:
– 1 cup powdered sugar
– 1/2 teaspoon vanilla extract
– 1/2 teaspoon almond extract
– About 2–3 tablespoons milk, adjusting until you reach your desired consistency.
Drizzle over cooled bars before slicing into pieces. Enjoy your delicious Cherry Pie Bars!
How to Serve Cherry Pie Bars
Cherry pie bars are a delightful treat that can be enjoyed in many ways. Whether for a casual get-together or a special occasion, these bars pair wonderfully with various accompaniments.
Pair with Ice Cream
- Vanilla Ice Cream: A classic choice that balances the sweetness of the cherry filling.
- Chocolate Ice Cream: For those who love a rich contrast, chocolate adds depth to each bite.
Drizzle with Sauce
- Chocolate Sauce: A warm drizzle enhances the flavors and adds an indulgent touch.
- Caramel Sauce: Sweet caramel complements the tartness of cherries beautifully.
Serve with Whipped Cream
- Fresh Whipped Cream: Light and fluffy whipped cream provides a creamy texture that pairs well with the bars.
- Flavored Whipped Cream: Consider adding vanilla or almond extract for added flavor.
Add Fresh Fruit
- Sliced Strawberries: Fresh strawberries bring brightness and add a refreshing element to your dessert.
- Raspberries: Tart raspberries can enhance the overall fruitiness and make your dessert look appealing.
How to Perfect Cherry Pie Bars
To ensure your cherry pie bars turn out perfectly every time, consider these helpful tips.
- Boldly Use Fresh Ingredients: Always opt for fresh butter and eggs for a richer taste.
- Boldly Measure Flour Accurately: Too much flour can lead to dry bars; spoon it into measuring cups rather than scooping directly.
- Boldly Cool Completely Before Serving: Allowing them to cool helps the bars set properly, making slicing easier.
- Boldly Experiment with Fillings: Feel free to use other fruit fillings like blueberry or peach for variety.
- Boldly Adjust Baking Time: Keep an eye on the color; they should be golden brown but not overbaked.
Best Side Dishes for Cherry Pie Bars
Cherry pie bars can be complemented by various side dishes that enhance their flavor. Here are some great options:
- Bold Fruit Salad: A mix of seasonal fruits adds freshness and balances sweetness.
- Bold Cheese Plate: Include sharp cheeses that contrast nicely with the sweetness of the bars.
- Bold Yogurt Parfait: Layer yogurt with granola and berries for a creamy side dish that pairs well.
- Bold Nut Mix: A crunchy nut mix provides texture and can balance out the soft bars.
- Bold Green Salad: A light green salad dressed in vinaigrette offers a refreshing palate cleanser.
- Bold Hot Tea or Coffee: Serve alongside warm beverages for a cozy finish to your dessert experience.
Common Mistakes to Avoid
Making cherry pie bars can be simple, but there are common pitfalls to watch out for. Avoid these mistakes for the best results!
- Ignoring Ingredient Temperature: Ensure your butter is softened to room temperature. Cold butter won’t cream properly, leading to a dense texture.
- Overmixing the Batter: Mix just until combined when adding flour. Overmixing can result in tough bars instead of the tender texture you want.
- Not Greasing the Pan: Always grease your baking pan well. This prevents sticking and helps you easily remove the bars after baking.
- Skipping Cooling Time: Allow the bars to cool completely in the pan on a wire rack. Cutting them too soon can lead to crumbling and messy slices.
- Using Low-Quality Ingredients: Opt for fresh or high-quality ingredients, especially for fillings. This enhances flavor and overall enjoyment of your dessert.
Storage and Reheating
Refrigerator Storage
- Store in an airtight container.
- Cherry pie bars will remain fresh for up to one week in the refrigerator.
Freezing Cherry Pie Bars
- Wrap individual slices tightly in plastic wrap.
- Place wrapped slices in a freezer-safe container; they can be frozen for up to three months.
Reheating Cherry Pie Bars
- Oven: Preheat the oven to 350°F and heat for about 10 minutes. This keeps them warm without drying out.
- Microwave: Heat individual slices on medium power for 15-20 seconds. Be cautious not to overheat, as they can become rubbery.
- Stovetop: Use a skillet on low heat with a lid for about 5 minutes. This method warms them evenly while keeping moisture intact.
Frequently Asked Questions
What are Cherry Pie Bars?
Cherry pie bars are a delicious dessert that combines cherry filling with a soft, buttery crust, offering all the flavors of traditional cherry pie in a convenient bar form.
Can I use fresh cherries in Cherry Pie Bars?
Yes! Fresh cherries can be used instead of canned filling. Just make sure to pit and slice them, and mix with sugar and cornstarch before adding them to your bars.
How do I know when my Cherry Pie Bars are done baking?
The edges should be golden brown, and a toothpick inserted into the center should come out clean or with only a few crumbs attached.
Can I customize my Cherry Pie Bars?
Absolutely! Feel free to experiment with different fillings like blueberry or apple, or add nuts or spices for an extra flavor kick!
Conclusion
These cherry pie bars are not only easy to make but also offer endless customization options. Whether you stick with classic cherry filling or try something new, they’re sure to impress family and friends alike! Give this delightful recipe a try today and enjoy a sweet treat perfect for any occasion!
Cherry Pie Bars

Indulge in the delightful experience of Cherry Pie Bars, a sweet treat that brings the charm of homemade desserts right to your kitchen. These easy-to-make bars feature a luscious cherry filling nestled between buttery layers, creating a perfect balance of flavor and texture. They are visually appealing and ideal for any occasion—from family gatherings to simple afternoon snacks. With a few straightforward steps, you can whip up these delicious bars that will surely impress everyone. Enjoy them fresh, or drizzle with a sweet glaze for an extra touch!
- Prep Time: 15 minutes
- Cook Time: 35 minutes
- Total Time: 50 minutes
- Yield: Approximately 24 servings 1x
- Category: Dessert
- Method: Baking
- Cuisine: American
Ingredients
- 1 cup unsalted butter (softened)
- 2 cups sugar
- 4 large eggs
- 1 teaspoon vanilla extract
- 1/4 teaspoon almond extract
- 3 cups all-purpose flour
- 2 cans (21 ounces each) cherry pie filling
- 1 cup powdered sugar (for drizzle)
- Milk (to adjust drizzle consistency)
Instructions
- Preheat your oven to 350°F (175°C).
- In a large bowl, cream together softened butter, sugar, and salt until light and fluffy.
- Add eggs one at a time, mixing well after each addition. Stir in vanilla and almond extracts.
- Gradually mix in the flour until fully combined.
- Spread half the dough into a greased baking pan. Top with cherry pie filling and drop remaining dough by teaspoonfuls over the filling.
- Bake for 30–35 minutes or until golden brown. Cool completely before drizzling with icing made from powdered sugar, vanilla extract, almond extract, and milk.
Nutrition
- Serving Size: 1 bar (approximately 70g)
- Calories: 210
- Sugar: 18g
- Sodium: 160mg
- Fat: 9g
- Saturated Fat: 5g
- Unsaturated Fat: 4g
- Trans Fat: 0g
- Carbohydrates: 32g
- Fiber: 1g
- Protein: 2g
- Cholesterol: 45mg